
Contents
Introduction
Your Raspberry Pi security is a very important issue. Gaps in this area leaves your server open to hackers who can then use it or extract information from it without your permission. The level of security needed will depend on the use you make of your Raspberry Pi. If it is going to work simply on your home network, behind a router with a firewall, then it should be already quite secure by default.
However, if your aim is to build your own domotic system in your Raspberry, exposing it directly to the internet by letting certain protocols through your router firewall (SSH and HTTP), then you should make some basic security changes.
In this post we will see some pieces of advice to improve the security of your Raspberry Pi, including configuring iptables and installing fail2ban.
Basic Raspberry Pi Security
In previous post have been already exposed some Raspberry Pi security tips:
- In this post was exposed how to create a new user to substitute the default user.
- Here was also explained how to configure the
sudoers fileto make it require a password. - To secure configure an SSH server in your Raspberry Pi using key based authentication read the following entry.
IPTables
Installing iptables
If your Raspberry is going to be reached from internet, you should limit and block unwanted inbound traffic. The easiest way to implement a firewall in your Raspberry Pi is using iptables. It comes already installed in your Raspbian. If you deleted it accidentally, you can install it again with the command below. You will need, however, to load new kernel modules. The easiest way to load them is to reboot your Pi.
sudo apt-get install iptables
In order to check the iptables rules in use, execute the following command:
sudo iptables -L
If you have not created any rules, you should see and empty rule set like the following:
Chain INPUT (policy ACCEPT)
target prot opt source destination
Chain FORWARD (policy ACCEPT)
target prot opt source destination
Chain OUTPUT (policy ACCEPT)
target prot opt source destination
Creating firewall rules
In a next step you should create a file to hold the firewall rules. Create a new directory in /etc/iptables/ and place there your rules:
mkdir /etc/iptables

touch /etc/iptables/iptables.firewall.rules
Now you can start to place your rules. The following is an example of rules files commented. You can adapt it to your needs (remember to update the SSH port), but it should be a good starting point.
*filter

# Don't accept any incoming network traffic unless a following rule overrides it.
:INPUT DROP [0:0]

# Accept any forwarding requests.
:FORWARD ACCEPT [0:0]

# Allow any outbound network traffic.
:OUTPUT ACCEPT [0:0]

# Allow all loopback (lo0) traffic and drop all traffic to 127/8 that doesn't use lo0
-A INPUT -i lo -j ACCEPT
-A INPUT ! -i lo -d 127.0.0.0/8 -j REJECT

# Allow all local network connections
-A INPUT -s 192.168.2.0/24 -j ACCEPT

# Accept all established inbound connections
-A INPUT -m state --state ESTABLISHED,RELATED -j ACCEPT

# Allow HTTPS and HTTP connections from anywhere (the normal ports for websites and SSL).
-A INPUT -p tcp --dport 443 -j ACCEPT
-A INPUT -p tcp --dport 80 -j ACCEPT

# Allow SSH connections
# Note that the -dport number should be the same port number you set in sshd_config
-A INPUT -p tcp -m state --state NEW --dport 9876 -j ACCEPT

# Allow ping
-A INPUT -p icmp --icmp-type echo-request -j ACCEPT

# Log iptables denied calls
-A INPUT -m limit --limit 5/min -j LOG --log-prefix "iptables denied: " --log-level 7

COMMIT
Be careful during this tutorial, as you could block yourself from accessing your Pi by applying incorrect rules set. To avoid that, always use the command iptables-apply, which will ask for confirmation after applying the rules to check if you can still connect. If you don’t respond in a certain amount of time it will assume you got disconnected and it will roll back the changes. If you do respond, it will apply the changes permanently.
Activating iptables
Once your iptables file is correctly edited, type:
iptables-apply iptables.firewall.rules

[ok] Stopping fail2ban (via systemctl): fail2ban.service.
Applying new iptables rules from 'iptables.firewall.rules'... done.
Can you establish NEW connections to the machine? (y/N) y
... then my job is done. See you next time.
[ok] Starting fail2ban (via systemctl): fail2ban.service.
To control your Raspberry Pi security, keep an eye on denied calls. Just check the syslog file:
tail -f /var/log/syslog
Jan 21 19:59:45 TrastoRaspberry kernel: [77384.521743] iptables denied: IN=eth0 OUT= MAC=01:00:5e:00:00:fb:c8:3d:d4:78:91:fb:08:00:45:00:00:11:22:33:00:00:01:11:c7:0b SRC=192.168.2.99 DST=224.0.0.251 LEN=68 TOS=0x00 PREC=0x00 TTL=1 ID=20119 PROTO=UDP SPT=5353 DPT=5353 LEN=48
The firewall rule set should be applied every time your Raspberry Pi is restarted. To automatically apply it after every restart, just place an script in /etc/network/if-pre-up.d/ with your preferred name that restores the rules like the following:
sudo vi /etc/network/if-pre-up.d/firewall

#!/bin/sh
/sbin/iptables-restore < /etc/iptables/iptables.firewall.rules
This script will run before turning on Raspberry’s network. Remember to change the permissions of the script to enable execution by doing:
sudo chmod +x /etc/network/if-pre-up.d/firewall
That was all. You can check if everything is in place by restarting your Raspberry and checking that the rule set is not empty by doing iptables -L.
Fail2Ban
Installing fail2Ban
fail2ban will scan log files and ban IPs that show malicious signs, such as too many password failures, seeking for exploits, etc. Fail2ban is usually used to update firewall rules to reject the IP addresses for a specified amount of time, although other actions, such as sending a notifications trough IFTTT can also be configured.
To install fail2ban just execute the following command:
sudo apt-get install fail2ban
As usual, configuration files can be found under the path /etc/fail2ban and are the most important parts are the following:
- fail2ban.conf is the main configuration file and usually should remain unaltered, apart from editing the loglevel. Customizations should be implemented in a local copy of the file.
- jail.conf contains the default banning rules.
- action.d is a directory that contains different scripts defining action to be executed in case suspicious activity is detected. This folder should contain the code to be executed in order to send notifications using IFTTT.
- filter.d folder contains mainly regular expressions which are used to detect break-in attempts, password failures, etc.
A copy of the configuration files can be found in my GitHub account.
Configuring fail2ban
Let’s start by configuring your fail2ban default behaviour by editing the file jail.conf. In the next lines I present the most important points that I changed to protect mainly an SSH and HTTP server with authentication. If you have other services in your machine, you will have to adapt the configuration to your needs.
vi /etc/fail2ban/jail.conf

[DEFAULT]

# Do not ban loopback interface and internal network IPs.
ignoreip = 127.0.0.1/8 192.168.2.0/16

# "bantime" is the number of seconds that a host is banned.
bantime = 600

# A host is banned if it has generated "maxretry" during the last "findtime" seconds.
findtime = 600
maxretry = 3

# The simplest action to take: ban only
action_ = %(banaction)s[name=%(__name__)s, port="%(port)s", protocol="%(protocol)s", chain="%(chain)s"]

# SSH configuration. Fail2ban will read the auth.log file searching attacks using the regular expressions defined in filter sshd. The port is used for banning purposes.
[ssh]
enabled = true
port = 9876
filter = sshd
logpath = /var/log/auth.log
maxretry = 3

# apache configuration. Fail2ban will apache error.log file searching attacks using the regular expressions defined in filter apache-auth. The port is used for banning purposes.
[apache]
enabled = true
port = https
filter = apache-auth
logpath = /var/log/apache*/*error.log
maxretry = 3
With this simple configuration you should be able to start using fail2ban. It will only ban the IPs according to the maximum retries specified, without doing any notification apart from the log information that can be found under /var/log/fail2ban.log. fail2ban is already prepared to send emails through an email server installed on your server. You can find a tutorial to do that in the following link. However, due to the big quantity of emails received every day, I found receiving a push notification directly in my smartphone a more interesting option. In the next section I explain how to do that.
IFTTT
Creating an Applet in IFTTT
IFTTT is a free web-based service to create chains of simple conditional statements, called applets. An applet is triggered by changes that occur within other web services, in our case this will be the detection of suspicious activities. In addition to the web-based application, the service runs on iOS and Android so applets can be configured to send push notifications directly in your smartphone.
First you should create your own account in IFTTT following this link. Once done, go to My Applets and click in New Applet.

Click in this and follow this steps:
- Step 1 – Select
Webhooksas triggering service. - Step 2 – Choose
Receive a web requestand write a name for the event. In our case we will usefail2ban. - Step 3/4 – Decide what will hapen when the trigger is detected. In our case, click in
NotificationsandSend a notification from the IFTTT app. - Step 5 – Configure the message of the notification. You can write text and add ingredients, which are dynamic parameters. Three of this parameters can be passed by the trigger request, the resting two are the event name and the date time when it happened. I will write in
value1the IP banned,value2the number of times this IP has been detected and invalue3the protocol which caused the ban. - Step 6 – Write a name for your Applet and a short description.
{{OccurredAt}}: IP Banned {{Value1}} after {{Value2}} failed access in system {{Value3}}.
To end up with IFTTT configuration, you will need to navigate to Webhooks settings and get your Webhook URL, which will be like the following: https://maker.ifttt.com/use/[YOUR_IFTTT_KEY]. Write down the IFTTT Key, it will be used a little bit later on this tutorial.
Connecting Fail2ban and IFTTT
In order to archive that Fail2ban triggers an applet in IFTTT, first create a copy of fail2ban’s dummy action files located in /etc/fail2ban/action.d/.
sudo cp /etc/fail2ban/action.d/dummy.conf /etc/fail2ban/action.d/ifttt.conf

sudo vi /etc/fail2ban/action.d/ifttt.conf
And then edit only the actionban section to the following:
actionban = curl -X POST -H "Content-Type: application/json" -d '{"value1":"'<ip>'", "value2":"'<failures>'", "value3":"'<name>'"}' https://maker.ifttt.com/trigger/[YOUR_EVENT_NAME]/with/key/[YOUR_IFTTT_KEY] 2>&1
This action will use curl to launch an HTTP Request containing a JSON payload with the IP blocked, the number of unauthorised accesses detected and the name of the protocol used.
Now you should define as default the action of banning and sending an IFTTT notification:
vi /etc/fail2ban/jail.conf

action_ifttt = %(banaction)s[name=%(__name__)s, port="%(port)s", protocol="%(protocol)s", chain="%(chain)s"]
ifttt[name=%(__name__)s, dest="%(destemail)s", protocol="%(protocol)s", chain="%(chain)s"]
# default action
action = %(action_ifttt)s
To implement all the changes done, restart Fail2ban and check that is running smoothly without any error in the log file.
sudo service fail2ban restart

tail -f /var/log/fail2ban.log

fail2ban.server [5606]: INFO Changed logging target to /var/log/fail2ban.log for Fail2ban v0.8.

fail2ban.jail [5606]: INFO Creating new jail 'ssh'
fail2ban.jail [5606]: INFO Jail 'ssh' uses pyinotify
fail2ban.jail [5606]: INFO Initiated 'pyinotify' backend
...
fail2ban.jail [5606]: INFO Jail 'ssh' started
fail2ban.jail [5606]: INFO Jail 'apache' started
Testing all together
You can simulate an intruder by creating a new SSH Connection from your client (connected away from the local network, otherwise it will always be ignored) and writing incorrectly the login data. When the maximum attempts is reached, you should see in fail2ban logs the following entries:
fail2ban.actions[29589]: WARNING [ssh] Ban 109.40.0.232
fail2ban.actions[29589]: WARNING [ssh] Unban 109.40.0.232
Of course, the unban will only happen after the banning time has passed. While the ban is activated, you can check in iptables the new line created to reject all the traffic incoming from the client used to simulate an intruder:
sudo iptables -L
...
Chain fail2ban-ssh (1 references)
target prot opt source destination
REJECT all -- ip-109-40-1-214.web.vodafone.de anywhere reject-with icmp-port-unreachable
RETURN all -- anywhere anywhere
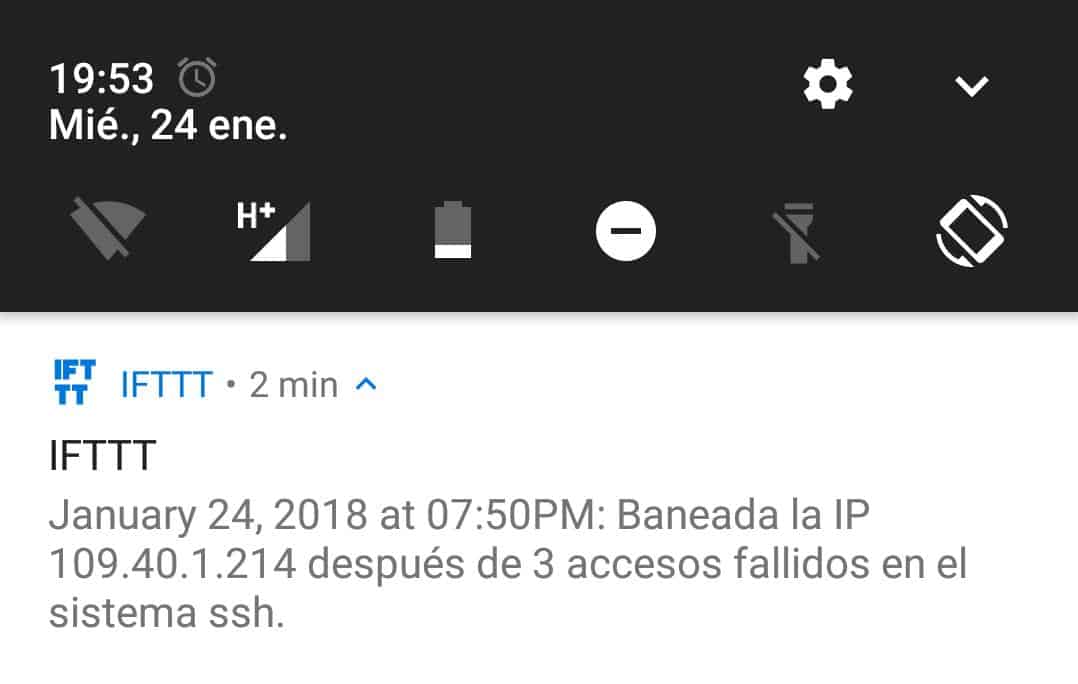
If the IFTTT connection is also in place, you should receive a notification like this:
Note that with the tips and tools exposed in this post your Raspberry Pi security will not be at 100% granted. I think this can only be achieved by disconnecting your server from Internet. However, you will have a protected machine that will inform you in real time of security issues so you can react quickly.
7 thoughts on “Raspberry Pi Security”