Contents
Introduction
In this post we will cover how to remotely connect to the command line of your Raspberry Pi from another computer or device using SSH key-based authentication. We will start connecting to the Raspberry Pi from the same network. In this post we will discuss how to reach your Raspberry from outside the local network.
Setting up SSH in the Raspberry
Since Raspbian version Jessie, SSH is not enabled by default, so the first step is, if not already done, to enable the SSH service as explained here. Alternatively, you can also enable SSH using systemct:
sudo systemctl enable ssh
sudo systemctl start ssh
SSH server listens port 22 by default. It is good practice to change the SSH server port to a a different one to increase your Raspberry security. By this way, a theoretical attacker will not know to which port send connection requests. This point is specially important if you are going to allow remote connections from outside your local network. To do that, you will only have to edit file /etc/ssh/sshd_config as stated below:
vi sudo /etc/ssh/sshd_config
The first zone of your SSH server configuration file are the ports being listened. If you want to use port 9876, you will have to edit the file and add the following content:
# What ports, IPs and protocols we listen for
Port 9876
After every change in the configuration, you will have to reboot the server by doing:
sudo service sshd restart
Configuring a static IP in your Raspberry
You will need to fix an IP to your Raspberry if you want to reach it easily. This step can be performed in several ways. one option is to edit your router’s DHCP (Dynamic Host Configuration Protocol) configuration to provide always the same IP to your Raspberry Pi MAC address. DHCP is a network service that automatically configures the IP settings of Ethernet devices connected to a network.
The DHCP configuration will vary depending on each router. In my case (EasyBox 904 xDSL), it can be found under Settings -> LAN -> IPv4. You only need to add a new entry associating your desired IP address and the MAC address of your Raspberry Pi.
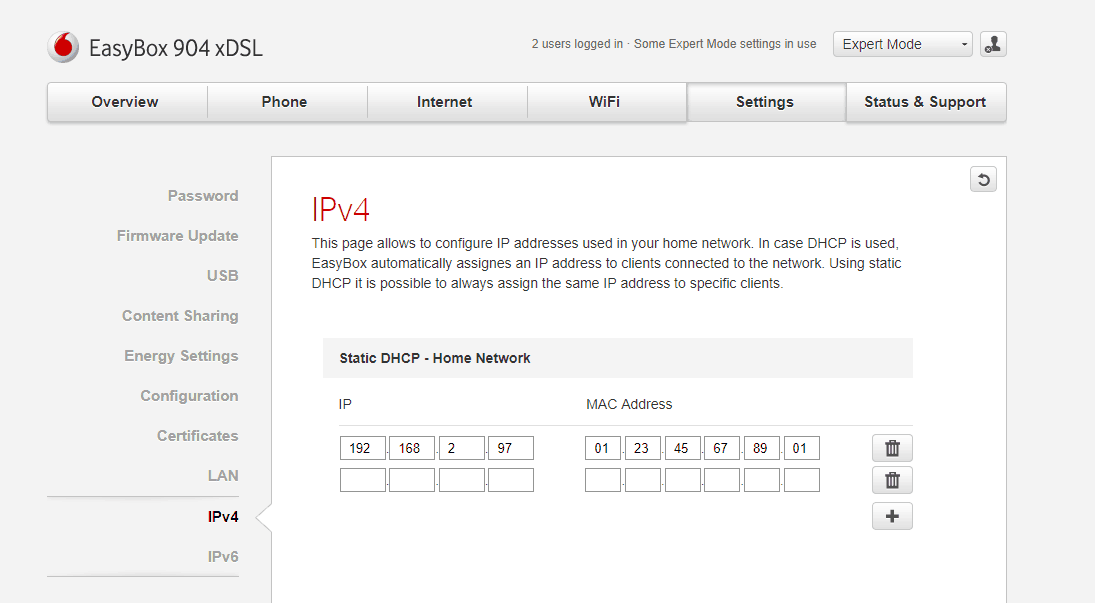
If you do not know your Raspberry Pi MAC address, type the following command:
ifconfig
eth0      Link encap: Ethernet  HWaddr 01:23:45:67:89:01
          inet addr: 192.168.2.97 Bcast:192.168.2.255  Mask:255.255.255.0
          inet6 addr: fe80::1432:9caf:8acb:2202/64 Scope:Link
          UP BROADCAST RUNNING MULTICAST  MTU:1500  Metric:1
          RX packets:5059428 errors:0 dropped:688 overruns:0 frame:0
          TX packets:3336537 errors:0 dropped:0 overruns:0 carrier:0
          collisions:0 txqueuelen:1000
          RX bytes:3273487231 (3.0 GiB)  TX bytes:1865980420 (1.7 GiB)
In order to use the IP offered by the DHCP service of your router, the Raspberry should be configured to use it. This configuration resides in file /etc/network/interfaces:
sudo vi /etc/network/interfaces
...
iface eth0 inet dhcp
...
There should be a line starting with iface eth0, which corresponds to the standard ethernet port of the Raspberry Pi. To use DHCP services, ensure that this line ens up with dhcp.
Another option is to configure your Raspberry to use static IP settings. To do so, just edit the interfaces file this way:
sudo vi /etc/network/interfaces
...
iface eth0 inet static
    address 192.168.2.97
    netmask 255.255.255.0
    gateway 192.168.2.1
...
You should adapt the file to match with your local network configuration, selecting your desired address, netmask and gateway.
Going headless
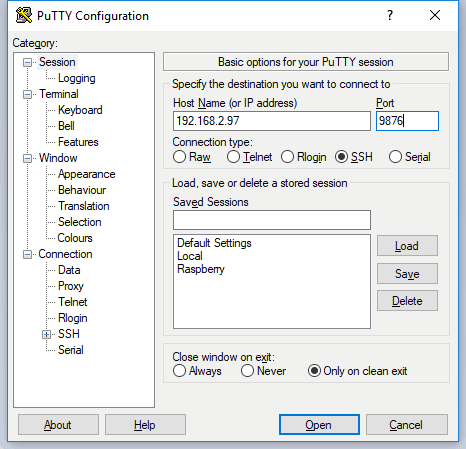
By this time you should be able to connect remotely to your Raspberry Pi from another computer or device in your network using an SSH Client. If you are using Windows, I would recommend to download PuTTY. For Android devices I have been using JuiceSSH with very good results.
Every program will have its own configuration. For instance, in PuTTY portable edition just open it, write down your IP address and port and click in open.
You will be asked to insert your username and password and, after a few seconds, you will reach the command line of your Raspberry Pi. From this point you can disconnect the keyboard and mouse, as well as the monitor, of your Raspberry Pi. Congratulations, your server is now headless! You can access directly to the Raspberry console from another computer.
Key based authentication
If your Raspberry Pi is exposed to the internet, it is very important to ensure that you have a very robust password. This will help to avoid dictionary attacks against your machine. Moreover, to do it even safer, you can also use key-based authentication, replacing the password by a key par of cryptographically secure keys.
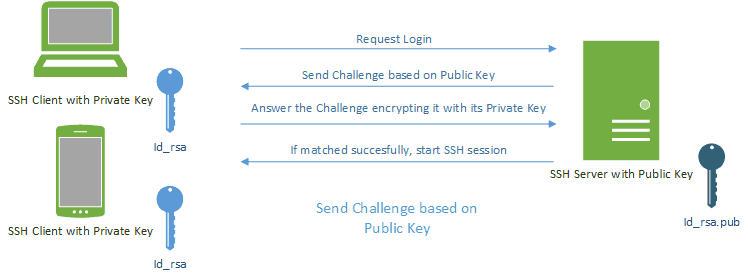
With this last option, you will generate two keys cryptographically linked to each other. One of the keys will be private and should never be released, meanwhile the public key can be freely shared. When a client wants to connect to a SSH server, the server will send him a challenge message based on the public key. The client will use his private key to encrypt this message and only if the server is able to decrypt this message back to the original challenge using the public key, can the identity of the client be confirmed.
Generating keys
You can generate the key pair directly in your Raspberry by using the ssh-keygen command:
ssh-keygen -t rsa -C dummyUser@domoticproject.com
You can use your email or a description to make it easier to identify your keys. After entering the command, you will be asked where to save the key par. You can use the default location /home/dummyUser/.ssh/id_rsa by just hitting Enter.
You can also specify a passphrase. This extra security step will make your private key useless without the passphrase. Thus, if somebody steals your key, he will not be able to use it unless he knows the passphrase too. The counterpart is that you will have to write the passphrase every time you want to use the key. Leave the field empty if you do not want to use this option.
Note that you should generate the keys only once (otherwise you will overwrite them) by calling the command with the user you want use the keys with. Once you complete the process you will find two files: the private key called id_rsa and the associated public key called id_rsa.pub. The key will be 2048 bits long: breaking the encryption on a key of that length would take an extremely long time, so it is very secure.
Placing the Keys
The private key should be moved to the computer/smartphone where you will be using the SSH client. You can send it by using scp (WinSCP is a good software to do that if you use Windows and you can use the PuTTY configuration) or by doing copy/paste (as you can see, both the public and private key are a long string of random characters). Remember to protect your private key and to avoid having uncontrolled copies of this file, specially if not protected with passphrase.
Now, you should add the public key to the authorisation file of the SSH server performing as follows:
cat id_rsa.pub >> ~/.ssh/authorized_keys
This command will append at the end of the file ~/.ssh/authorized_keys the content of your public key. Your authorised keys file can have multiple entries, depending on how many different clients you want to allow. Remember to check the permissions of this file, so that it can be read correctly by the ssh system.
sudo chmod 644 ~/.ssh/authorized_keys
Configuring PuTTY with keys
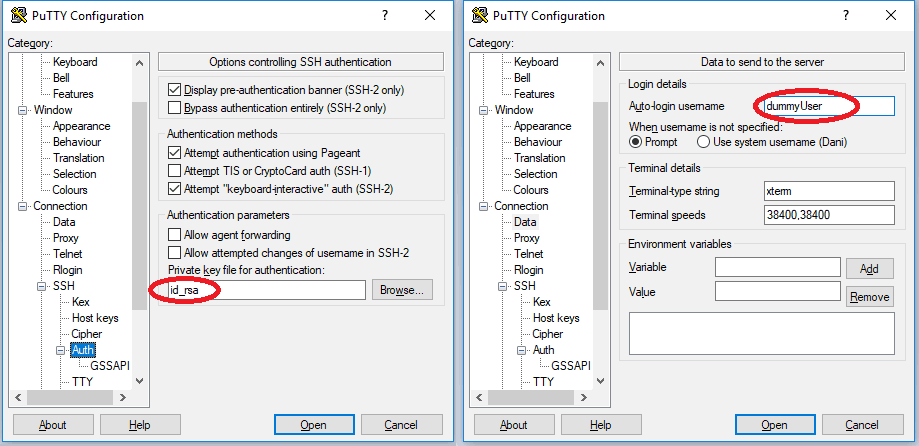
By now you should be able to use your private key to login into your Rasperry Pi. In order to configure PuTTY just open it, click in Connection -> SSH -> Auth and select the location file of your private key. To avoid being asked with every connection, you can also write your username by selecting Connection -> Data.
Remember to save your session configuration before doing click in Open!
Security advice
To end up with this tutorial, and as a security best practice, it is recommended to disable password logins, so that all authentication is done by the key pairs. To do so, you will need to edit your sshd_config file.
vi sudo /etc/ssh/sshd_config
There are two configurations that need to be changed to no (or be commented with a # at the beginning of the line):
ChallengeResponseAuthentification no
PasswordAuthentification no
Save the file and restart the SSH service:
sudo service sshd restart
Check that the pair username/password can no longer by used. From now on, you will have to use your private key to access the console of your Raspberry Pi.
8 thoughts on “Connecting to your Raspberry Pi via SSH”