Contents
Introduction
In previous post we saw how to reach your Raspberry Pi from any internet connection. However, you may have noted, that when trying to connect with your Raspberry Pi from a device in the same network, your browser timeouts without reaching your server. In this post we will cover the causes of this problem and how to implement a solution: installing a DNS Server in your Raspberry Pi.
The problem
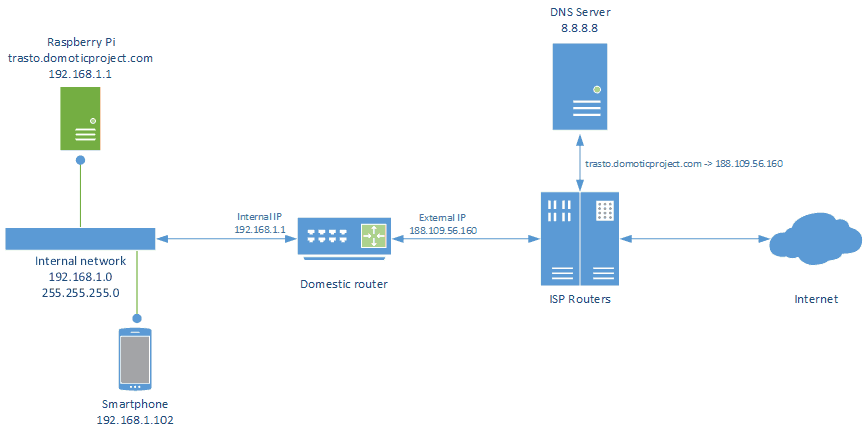
Imagine that you are using your smartphone’s browser to reach your Raspberry Pi, whose hostname is trasto.domoticproject.com. Your smartphone does not know what the IP of the hostname is, so it first asks the question to the configured DNS Server. It will usually be your ISP’s DNS Server or Google’s DNS Server, depending on your DHCP configuration. If the DDNS configuration is working correctly as explained in this post, the DNS server will translate the hostname using your router’s external IP. So, once the DNS question is answered, you smartphone will try to access to your Raspberry Pi by accessing the IP 188.109.56.160, which is simultaneously its external IP Address.
As you can note, the problem you are facing is, basically, that your smartphone is trying to reach a host which is in the same local network as if the host was located outside this network. This connection will usually timeout because your router, instead of redirecting the HTTP Request to the Raspberry Pi locally, will send it to the ISP Router, which will redirect it again to your router, which usually will not be able to answer to an HTTP Request sent by himself.
An easy solution to this problem could be to edit the host file of your smartphone or computer. This host file maps hostnames with IP Addresses. By adding the host trasto.domoticproject.com to the IP 188.109.56.160 the problem should be solved. In a computer this operation is relatively easy, however in a smartphone you will surely need root access. However, if your device leaves the local connection (for instance if you take your laptop to work), you will need to remove these changes from the host file.
The solution: a DNS Server in your Raspberry Pi
A more elaborated solution would be to install a DNS Server in your Raspberry Pi. This way the DNS queries performed by the devices in your network will be addressed to the Raspberry. The Raspberry then will redirect them to an external DNS Server, except for those aiming your domain/host, which will be answered locally. For instance, if you try to reach www.google.com from your smartphone, your Raspberry Pi DNS Server will forward the query to the external DNS Server. Once a reply is received, this will be resent to your smartphone. However, if the host address is trasto.domoticproject.com, the DNS Server will directly reply with the local address of the server, solving by this way the problem we were facing.
Moreover, installing a local DNS Server in your Raspberry Pi will provide with a number of advantages:
- Speed. The local DNS Server will have a memory cache to save the answer to the most recent queries. When a caching DNS server tracks down the answer to a client’s query, it returns the answer to the client. But it also stores the answer in its cache for the period of time allowed by the records’ Time to Live (
TTL) value. The cache can then be used as a source for subsequent requests in order to speed up the total round-trip time. So, once a reply is cached, a second query will be answered significantly quicker. - Privacy. The DNS system is based on sending requests to third-party servers, generating fingerprints that many users prefer to avoid. By using a proprietary DNS Server, many of this information remain safe.
- Security : By hosting a DNS Server you will have control over the NS records, avoiding some security issues (DNS cache poisoning/spoofing, etc.).
Installing BIND in Raspberry Pi
In this tutorial we will see how to install Bind. If BIND is not of your preference, there are some other DNS Servers, such as Dnsmasq (focused on leaving an small footprint) or pi-hole (whose main aim is to filter adds). First of all install the software packets by typing:
sudo apt-get install bind9 bind9-doc dnsutils
The most important files to configure BIND are the following (note that named and BIND are two names for the same application):
- /etc/bind9/named.conf. It is the main configuration file and consist of a collection of statements using nested options placed in ellipses { }. It will usually only contain references to the rest of the configuration files.
- /etc/bind9/named.conf.options. It contains all the configuration options for the DNS server such as the port to listen, the forwarders to use, etc.
- /etc/bind/named.conf.local. This file has the local DNS server configuration. This is where we will declare the zones associated with the local server by configuring domains. These domains will be searched locally instead of being searched outside using forwarders.
- /etc/bind/named.conf.default.zones. It contains the default zones of the server.
Basic BIND Configuration
The standard configuration of BIND will provide you with with a cache/forwarder DNS Server that will recursively seek answers from other DNS servers when a client issues a query. This means that your Raspberry Pi will do the work of querying each related DNS server in turns until it finds the entire response. You can read more about how DNS works on this site or in this comic. Once the answer is received, your local DNS Server will reply to the client and will save it in a cache file. In the future, if a client places again the same query, the answer will be considerably faster.
Let’s have a deeper look at this basic configuration in named.conf.options file.
# Access Control List that includes the loopback interface and the local network
acl internals {
127.0.0.0/8;
192.168.1.0/24;
};

options {

directory "/var/cache/bind";
auth-nxdomain no;
# Forward queries to:
forwarders {
8.8.8.8; # Google DNS
9.9.9.9; # IMB Quad9 DNS
192.168.1.1; # ISP DNS (router's own DNS)
};

# Listen port 43 from loopback and our own IP Address
listen-on port 53 {
127.0.0.1;
192.168.1.100;
};

# Don't listen IPv6 traffic
listen-on-v6 {
none;
};

# Allow queries from loopback and our internal network
allow-query {
internals;
};

# Do not transfer the zone information to the secondary DNS
allow-transfer {
none;
};

// Allow recursive queries to the local host
allow-recursion {
internals;
};

};
- First of all, an Access Control List is defined. It should include the devices allowed to use the DNS. In this case, the loopback interface and the internal network IPs.
- The
TTLor Time to Live - Section forwarders contains the DNS Servers IP that will be used to forward and answer the DNS queries. In my case, I use Google and IBM servers, but feel free to choose others. You can find more alternatives in the following link.
- The next two sections configure the listeners, limited to local interfaces and IPV4.
- Finally the last three sections allow queries, transfers and recursions for the devices defined in the acl labeled internals.
After implementing the changes save and close the file. By now you should have a DNS server able to forward queries and save them in cache. If you want to know more about other BIND options, such as the maximum time for cached records, have a look at this link.
Testing your DNS Server
The configuration files syntax can be tested using the following command:
sudo named-checkconf
</pre
If there are no syntax errors , the shell prompt will return immediately without displaying any output. However, if there are syntax errors, you will be alerted to the error and line number where it occurs. Just go back and check your files for errors.

When you have verified that your configuration files do not have any syntax errors, restart the BIND daemon to implement your changes:
sudo service bind9 restart
Keep an eye on the server logs to make sure that everything runs smoothly. You should see in your log that the process whose name is named is in status running after a few seconds.
sudo tail -f /var/log/syslog
Let’s try now to make a DNS Query to our new server. At the beginning of this post we installed dnsutils, which includes dig, a program to query the DNS in various ways.
dig domoticproject.com

; DiG 9.9.5-9+deb8u13-Raspbian domoticproject.com
;; global options: +cmd
;; Got answer:
;; HEADER- opcode: QUERY, status: NOERROR, id: 56393
;; flags: qr rd ra; QUERY: 1, ANSWER: 1, AUTHORITY: 0, ADDITIONAL: 1

;; OPT PSEUDOSECTION:
; EDNS: version: 0, flags:; udp: 512
;; QUESTION SECTION:
;domoticproject.com. IN A

;; ANSWER SECTION:
domoticproject.com. 30 IN A 45.58.132.162

;; Query time: 21 msec
;; SERVER: 192.168.2.1#53(192.168.2.1)
;; WHEN: Sat Jan 20 22:18:06 CET 2018
;; MSG SIZE rcvd: 63
As you can see, a query has been sent and the answer has been received in 21 milliseconds. If you repeat the process after a few seconds, you will find that the query time is significantly reduced to 1 or 2 milliseconds.
root@TrastoRaspberry:/home/dani# dig domoticproject.com | grep Query
;; Query time: 24 msec
root@TrastoRaspberry:/home/dani# dig domoticproject.com | grep Query
;; Query time: 1 msec
Note that the time a query is stored in your DNS server cache will depend, apart from BIND‘s configuration file, on the TTL of the record. As you can see in the first dig query, the TTL of domoticproject.com is only 30 seconds. After that, the cache information will time out and, if a new query is received, it should be forwarded again.
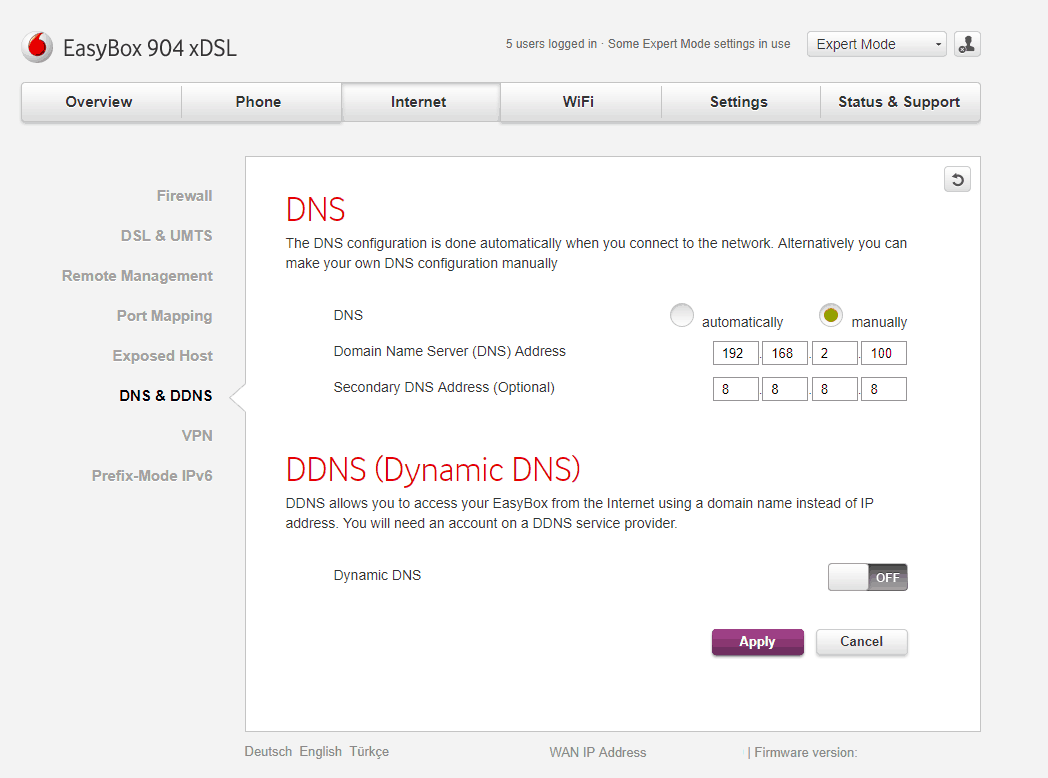
Configuring Clients with the DNS Server
In a next step you should configure your devices to use your new DNS Server. Note that this step will usually depend on the Operative System of the device used. However, and depending on your router, this can be archived very easily changing the DHCP configuration. DHCP is a protocol that dynamically assigns IP Addresses and other network configuration parameters to each device on a network so that they can communicate with other IP networks. One of this network configuration parameters is the DNS Server. In the following image it is shown how to assign the primary DNS address to your BIND Server, leaving the secondary address to Google’s DNS.
Alternatively, you can also change manually the DNS Servers to be used in your device. For instance in Windows you should access the Network and Sharing Center and change your internet connection properties. More info can be found in this site.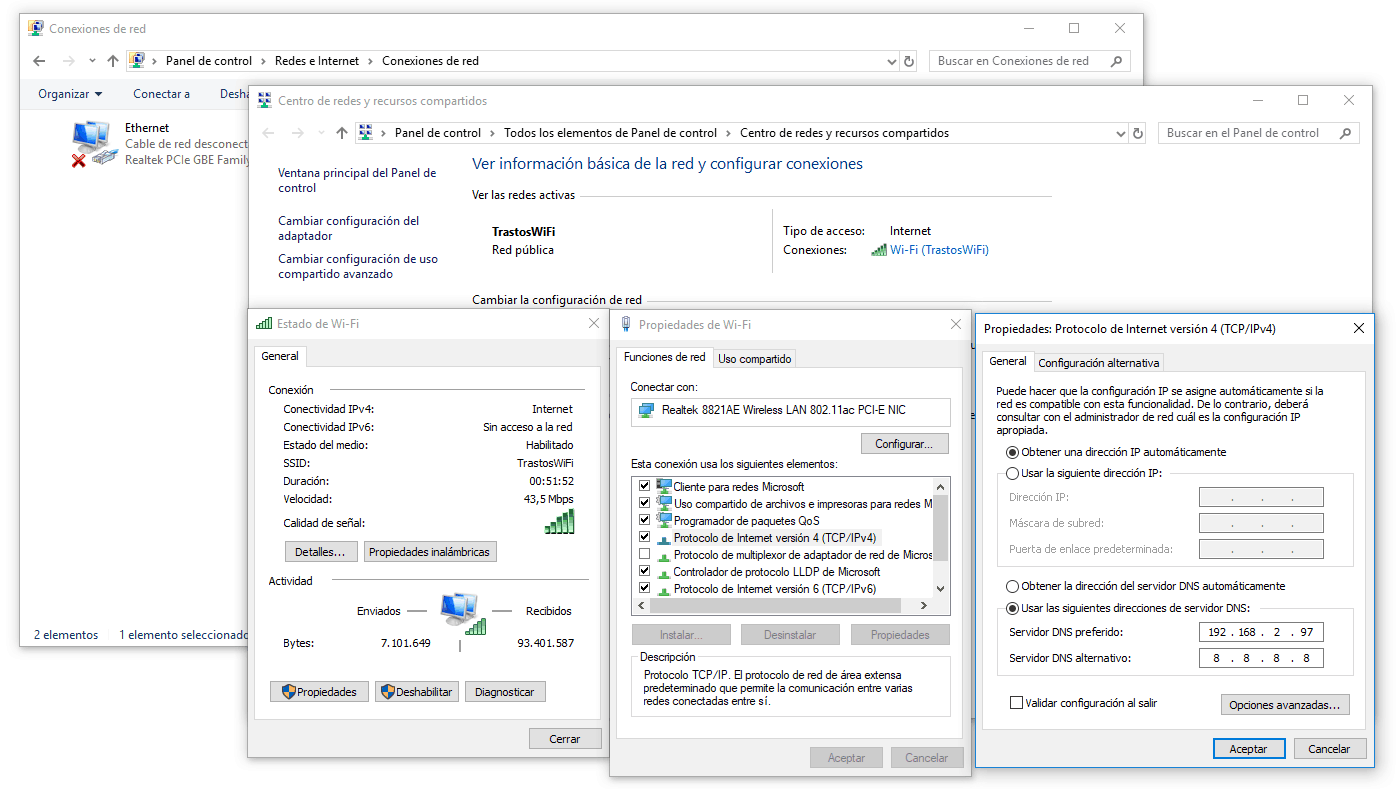
On a linux system this change is much easier. You can follow the instructions in this post. Alternatively, you can also edit the resolv.conf file and include the following line:
vi /etc/resolv.conf

nameserver 192.168.2.1
If you want to change the DNS of your Android device, just follow this instructions.
After implementing the changes, you should be able to use your DNS Server from your device.
Creating a local zone
Once BIND is working correctly as a cache and forwarder DNS Server, the next step will be to define a local zone. To do that you need to edit the file named.conf.local and declare the zone to be solved locally there.
zone "trasto.domoticproject.com" {
type master;
file "/etc/bind/domoticproject.db";
};
The zone name should be the host name of your Raspberry Pi, and should include the full domain name. The server should be defined as the master on the domain and you should include a zone file path. This file will be dedicated to name resolution and should include the local IP where your server is. Create this file as a copy of the db.local file that is in bind9 installation folder.
sudo cp db.local domoticproject.db
Open the file with your editor and make the following changes:
$TTL 604800
$TTL 604800
@ IN SOA trasto.domoticproject.com. root.trasto.domoticproject.com. (
2 ; Serial
604800 ; Refresh
86400 ; Retry
2419200 ; Expire
604800) ; Negative Cache TTL
;
@ IN NS eltiempo.domoticproject.com.
@ IN A 192.168.1.100
- Replace the first “localhost” with your hosts’ FQDN (fully qualified domain name), in this case,
trasto.domoticproject.com. Then replace “root.localhost” with “root” followed by your hostname. - Serial is an integer that should be incremented every time you a zone file is edited. So before restarting the named process, change it accordingly.
- The
NS recordrepresents information on behalf of nameservers for the domain. - An
A recordassociates a host name to an IPv4 address (32 bits). So with this line the host trasto.domoticproject.com will be associated with the internal IP 192.168.1.100.
These changes should be enough for our purposes. However, you can also create a reverse zone file to enable the translation of your host IP address to the hostname. You can find more information about creating a Reverse Zone File in the following site. Remember to restart the BIND server to read and to implement the changes done.
Testing the local zone
Once your local zone is created, it is time to test it. In windows just open a command line and type:
nslookup
Servidor predeterminado: UnKnown
Address: 192.168.2.100

trasto.domoticproject.com
Servidor: UnKnown
Address: 192.168.2.100

Nombre: trasto.domoticproject.com
Address: 192.168.2.100
As you can see, your hostname is now solved locally, returning the address of your Raspberry Pi. If you are already running a web server, just open your browser and try to access to your hostname. Where you used to receive a timeout, you should be able now to access your server without problems.
Thank you for your work.
In:
#6. “Testing your DNS Server”
Instead “sudo named-checkconfig”
have to be “sudo named-checkconf”
Thanks!
sudo apt-get install bind9 bind9-doc dnsutil
should be dnsutils
Thanks for everything else
Thanks!
this didn’t help me a second, i have lost more than 5 hours of valuable time and didn’t make any process.
i am soo pissed right now ,)
you skipped a whole lot of steps and you expect everyone to come along are you fucking stupid???? maybe you should let people now that they need a decent amount of programming skills.
this is the worst tutorials ever……….
Take a breath. You have a somewhat peculiar way of asking for help in an internet post 😀
If you want to help, write down the missing steps, I’ll update the post.
I don’t know what you mean by programming skills, there isn’t a single line of code in the tutorial. What you need is some computer knowledge, patience, and google 🙂
Wow…just wow… Why blame someone else for your own ignorance?
This is actually a pretty good and complete tutorial. To understand bind, yes, you need to invest time and read about it, but even that is not required to follow this tutorial.
Keep up the good work, Dani. Your reaction to such a rant is great :).
Agreed Rob, this is one of the better tutorials I’ve come across in the last few years. I personally hate the time wasted on watching you tube videos which are great for how to cut hedges but for technical details like this always miss out a whole load of info.
Dani, Years since I used bind and I never really understood split DNS. ACLs appear to be a better way of achieving this but one question before I dive in. If I have an external provider of a service, say email and want to use the same domain name internally and externally, how would this cope with sending my client to the external service. e.g. domain is IOM.org with external mail server mail.iom.org, is it really just mail.iom.org IN A in the conf file?
Hello Rick,
I am not sure I have enough knowledge to answer you correctly.
However, I can try. First o all, are you sure the address being used by your client is mail.iom.org? Usually they start with smtp or imap (or pop). Anyway, I think you are right. If you create a local zone and resolve the address of the email server to its external IP, I think it should work fine.
I hope it works!
Have fun,
Dani
Hmmm, sorry that stripped out a bit. Probably because I tried to be smart and use angled brackets.
It should have read mail.iom.org IN A externalIPAddress
I have been looking for a good tutorial for doing exactly this and it worked straight away. I found many other “tutorials” that left me more confused after going through it than before I started! However this one was right on the money. Thank you for taking the time to do this.
after any edits the author did, it hit first time around within about 15 minutes, Really the hardest part of it was to get Bind NOT to use my default(ISP) dns server, simply for testing of course.
Hello,
many Thanks.
I’ve tried it with dnsmasq but no help.
then I tried to mix yours with this:
https://www.sbarjatiya.com/notes_wiki/index.php/Configuring_IPv6_and_IPv4,_forward_and_reverse_DNS
Also no help.
But only yours alone helps !!!
Why not “recursion yes” ???
Can you also optimize it with IPV6 ???
Best thanks again and regards