Contents
Introduction
Accessing your Raspberry Pi from your home network is cool, but if you want to build a domotic system it must be reachable from any internet connection. In this post we will cover a very common method to easily access your Raspberry Pi over the internet from another computer or mobile device: DDNS. However, and before starting, I have to admit that there are a lot of valid ways to archive this. The validity of these methods will probably depend on your router and/or internet provider.
Internal versus External IP
Maybe you already know the difference between an internal and an external IP. In this case, you can go directly to the next section. Otherwise, I will explain very briefly what is the difference between an internal and an external IP address.
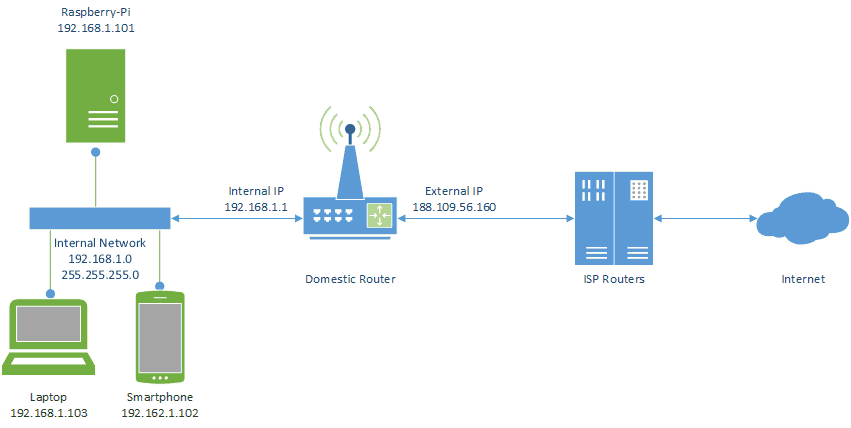
As you can see in the image, a router usually has two (or more) interfaces connecting different networks. The internal interface is connected to the internal network, and has an internal (or private) IP. Each of the devices connected to your internal network also has an internal IP, which is usually managed and assigned by your router DHCP service, as explained in this post. The Internet Assigned Numbers Authority (IANA) has reserved different IP address blocks for private networks. These ranges are 10.X.X.X, 172.16.32.X.X and 192.168.X.X. So, whenever you see an IP address inside this range there is no doubt: this is a private IP address.
Additionally, the external interface of your router also has an external (or public) IP assigned by your Internet Service Provider (ISP). All the devices inside the internal network use and share this same address to access internet. The router uses Network Address Translation (NAT) or other similar method to match the internal IP address with the external requests received. In order to know your current external IP Address you can type the following command (it relies in a third-party website):
curl ip.changeip.com

188.109.56.160
IPADDR=188.109.56.160
Dynamic IP versus Static IP
The main problem to access your internal network (where your Raspberry Pi is connected) from the internet is (at least in my case, it was) that domestic routers do not usually have an external static IP. Due to the shortage of IP addresses it is possible that after a router’s reboot you receive a new and different external address from your ISP. During the period the router is disconnected, your old address could have already been assigned to another customer.
This dynamism in the allocation of IP addresses makes very difficult to keep track of them. If you are lucky, your ISP provider may offer you an static IP for some money per month. Unfortunately, it was not my situation. Otherwise, you will need to use a Dynamics DNS (DDNS) service to access your home network.
Dynamics Domain Name System (DDNS)
A Domain Name System (DNS) protocol is a part of the infrastructure of the and serves as the Internet phone book: every time you visit a website, instead of remembering all the telephone numbers/IP addresses “by heart”, you only need to type the name of the person/domain name (domoticproject.com, for instance) you want to call/visit and your computer performs a DNS lookup to get the corresponding IP address. Most ISP offer free DNS services, however I would recommend for its speed to use Google’s DNS (8.8.8.8 and 8.8.4.4).
With DDNS, the IP assigned to your domain name is automatically updated by a piece of software running in your Raspberry Pi. So whenever your external IP address changes, the IP of the domain will be updated to reflect that change.
There are a number of different providers that offer Dynamics DNS free of charge. I have been using for a year no-ip.com. Their free service allows you to choose up to 3 hostnames in a list of available domains. The bad part of this free provider is that they force you to login and confirm your hostname every 30 days. In their webpage you can download a free software to automatically update your IP (you can find more information here).
Nowadays I have moved to change-ip.com in order to integrate my WordPress hosting (where this blog lives), my internal website to control the domotic system and a DDNS service. We will explain in the next sections how to archive this.
Your own domain in ChangeIP
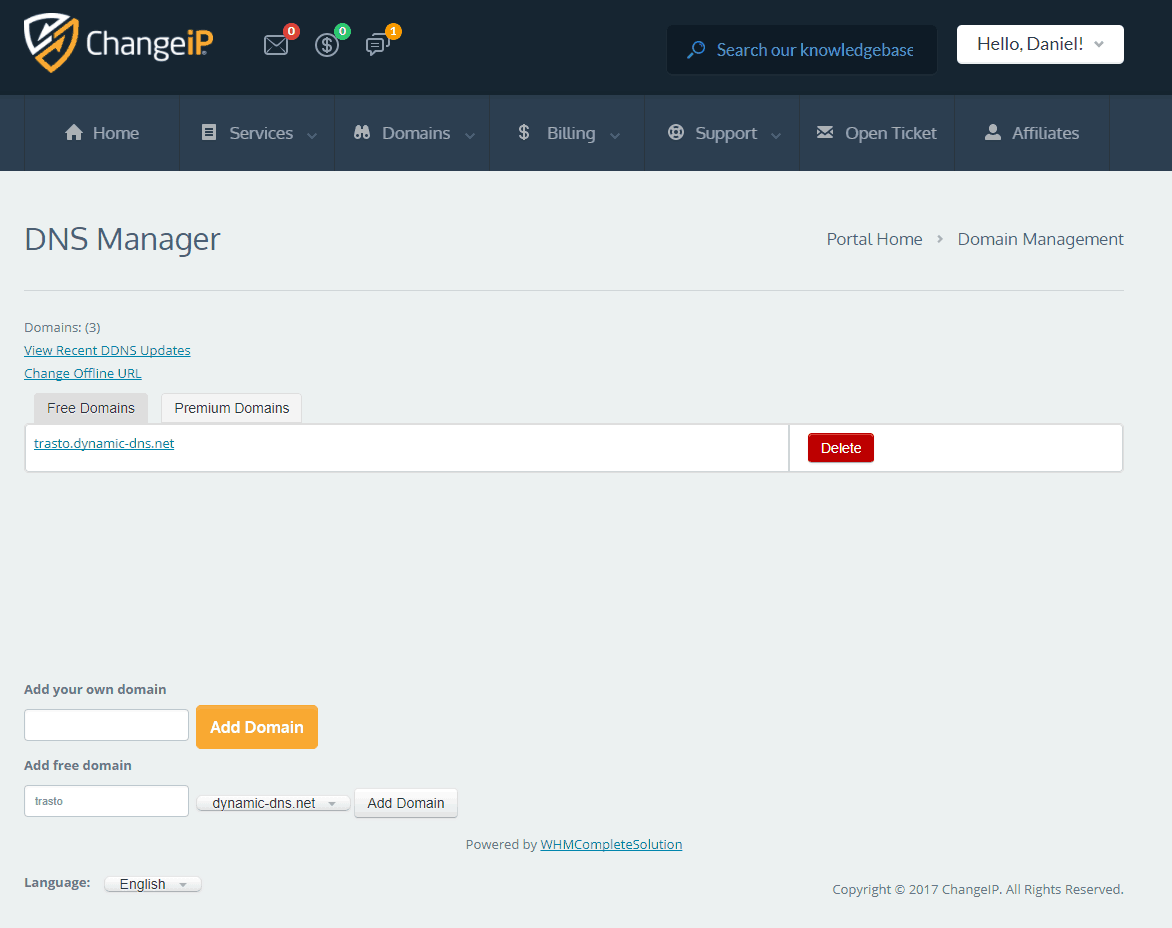
Creating you own domain in ChangeIP is very easy. First of all, you need to create your own user in the service. Once logged in, go to “Services – DNS Manager“. If you want to use a free domain, click in the Free Domains Tab. After doing this, choose one of the domain names offered and write your hostname. Finally, make click in “Add Domain” button (and maybe a few more clicks) to confirm the operation.
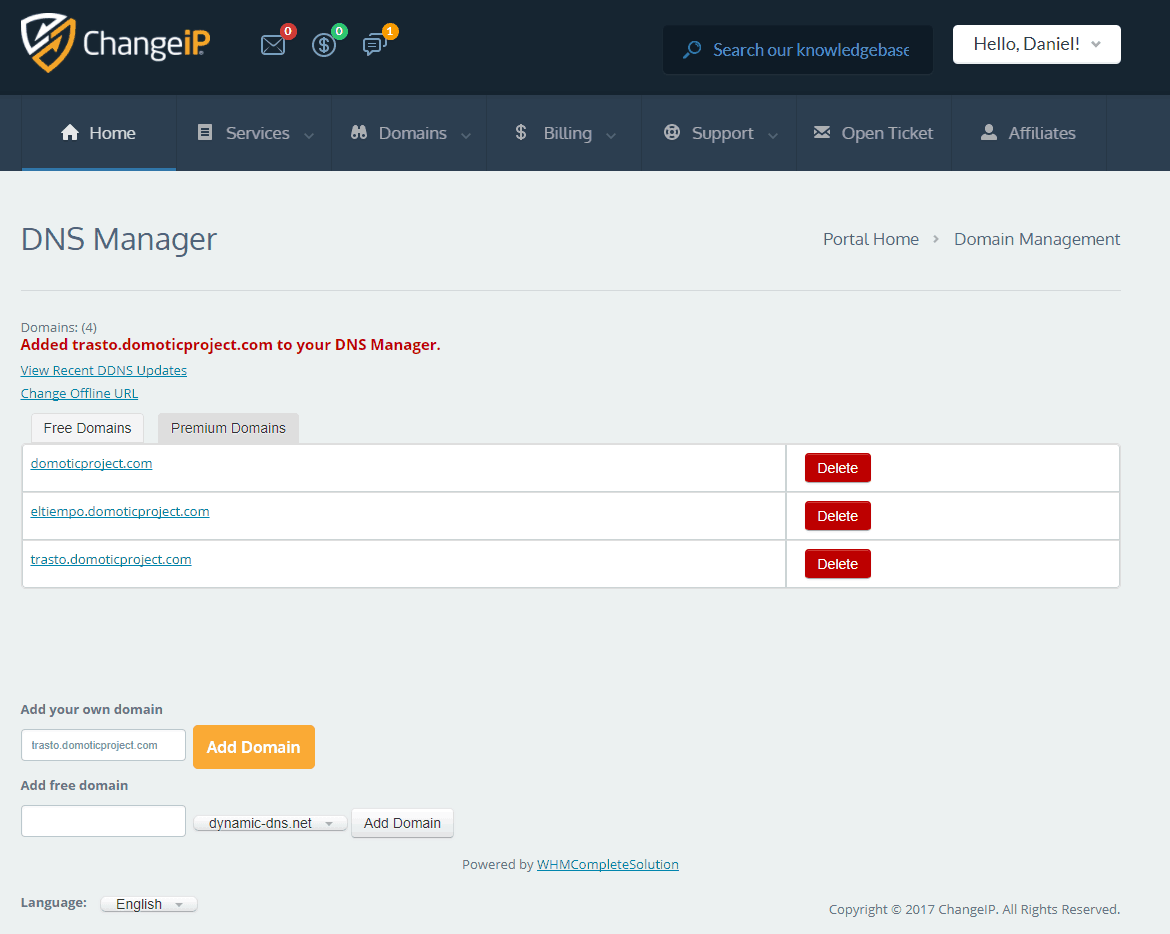
Alternatively, you can also choose to acquire your own domain for fewer as 15 dollars per year. To do so, go to “Domain – Register a new domain“. Choose at the top level which domain you prefer (prices will vary) and the domain name to buy. You need to enter some information to end up the process, but after a few minutes your own domain will be fully operative. If you want to have more than one subdomain inside your own domain (as I have), add them under “Services – DNS Manager“.
Name Servers and DNS Records
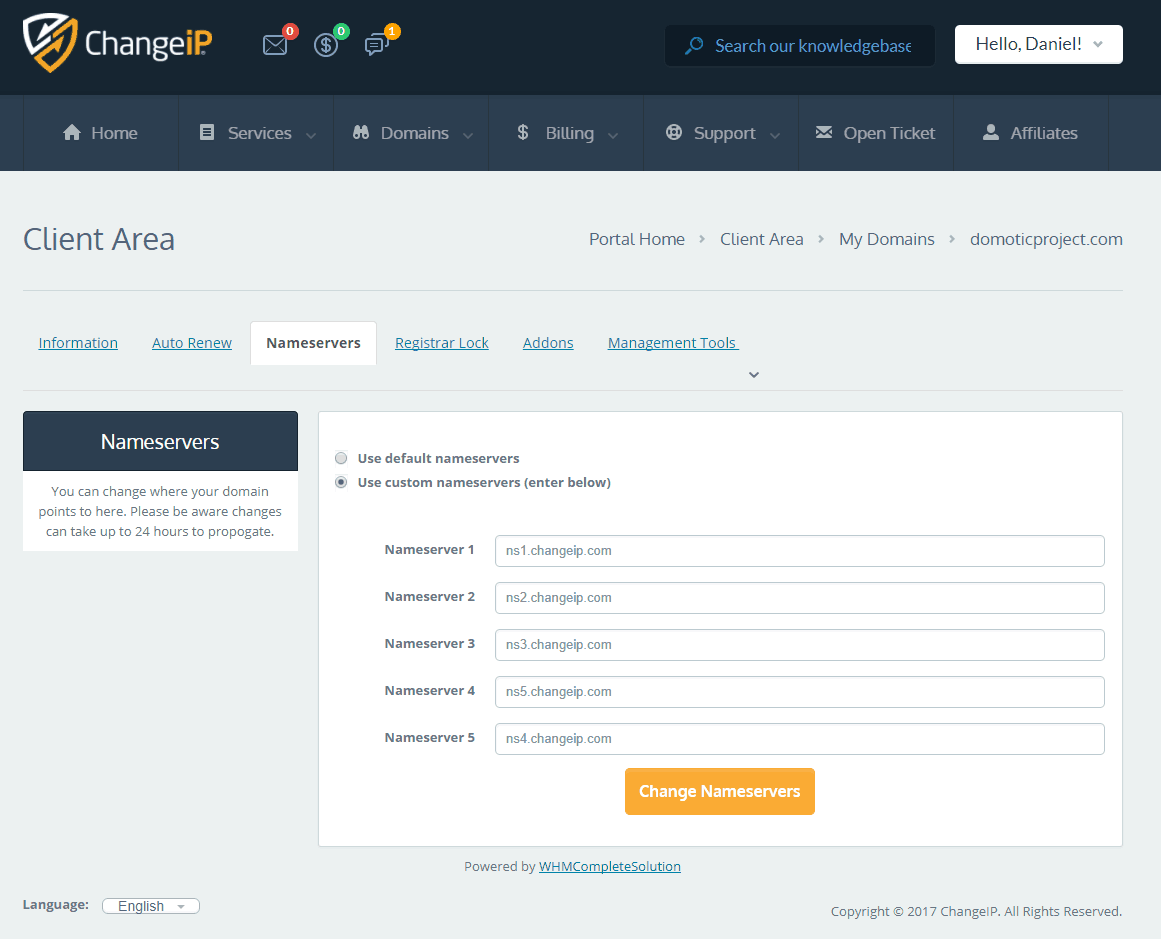
In the specific case of ChangeIP, there are two different groups of name servers. The web hosting manages the DNS using the name servers of type ns.web1.changeip.com ns1.web1.changeip.com, etc. However, the Dynamic DNS which updates the DNS uses the name servers ns.changeip.com, ns1.changeip.com, etc. So, to be able to use the Dynamics DNS service you need to change the name servers to point the second group. You will find this configuration under “Domains – My Domains – Manage Domain – Name Servers“. To do so, first of all remember to disable to register lock and, secondly, perform the migration individually. I mean, change a name server one at a time. Otherwise you can find some unexpected and undesired errors!
Under the “DNS Manager” presented in previous section you can also edit the records associated to your domains and/or subdomains. You can check there if the name servers have been correctly updated to the desired values. Moreover, you can also update the A record to point the external IP Address of your Raspberry Pi.
An A record simply maps a domain name to the IP address of the computer hosting the domain. The TTL column is the time-to-live in seconds. This is the amount of time that the record is allowed to be cached by a resolver. Keep it reduced to propagate the IP changes quickly over the resolvers. As previously stated, the update of the dynamic IP address will be automatically done by a piece of software called DDClient.
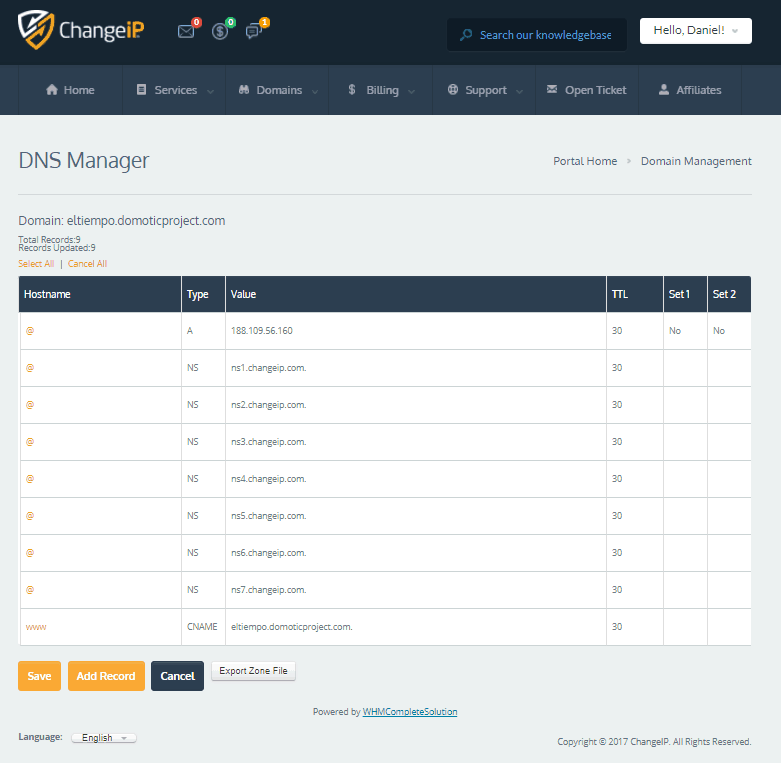
A final note: you do not need to care about the DNS Editor of the Cpanel of your ChangeIP webhosting; everything related to this domain will be managed under the menu “Services – DNS Manager“.
Installing DDClient
If you have reached this point, you should have by now a domain name pointing to your home external IP. Remember that the DNS update will take some time to be propagated. You can check what is the resolution address of your domain name by using nslookup command (the second parameter, 8.8.8.8, is one of the DNS servers of Google).
nslookup eltiempo.domoticproject.com 8.8.8.8
Server: 8.8.8.8
Address: 8.8.8.8
Non-authoritative answer:
Name: eltiempo.domoticproject.com
Address: 188.109.56.160
The address returned should be the external address of your Raspberry, if you updated the A record correctly in previous step. Note that, depending on the TTL configured, the propagation of the changes could take some time.
The following step will cover how to install in the Raspberry the DDNS software that automatically updates the A record of your domain name to point the external IP address of your router. We will use ddclient to do so, but you can also use an specific script such as rinker or create your own solution. To install ddclient just type:
sudo apt-get install ddclient
Some routers include their own DDNS client while other do not. Therefore, if yours supports it, and is configured to use your DDNS service provider, you can use it. In my case, ChangeIP was unfortunately not included in the list of compatible DDNS providers. However I always find a better and more controlled solution to launch a client such as DDClient to update the dynamic IP.
Configuring DDClient
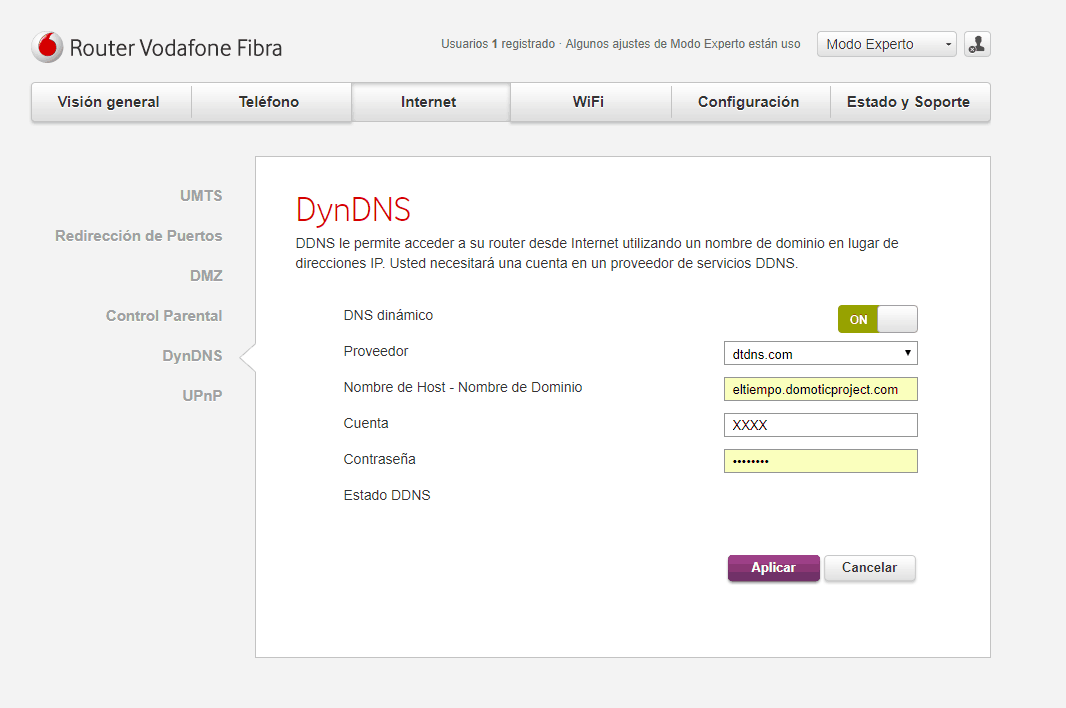
During the installation, it will probably have already asked you some questions and will have prepared a useful config file. Now you have to open this file and adjust the needed parameters:
sudo vi /etc/ddclient.conf

# Configuration file for ddclient generated by debconf
#
# /etc/ddclient.conf

ssl=yes
protocol=changeip

# How to get your external IP
use=web, web=ip.changeip.com

# Update config
server=nic.ChangeIP.com/nic/update
login=your@email.com
password='XXX'

# Domain to update
eltiempo.domoticproject.com
It is important to use always SSL to avoid sending your login name and password over the Internet unencrypted. Protocol can be set to ChangeIP, or any of the previoulsy mentioned sites in the following link. If your DDNS service provider does not appear in this list, it is probably better to use another software to update your dynamic IP. Otherwise, you will have to invest some time to adapt ddclient to your provider. The current external IP can be obtained using the web service hosted in ip.changeip.com. Update you login information, password and host to update and save the file.
Now you should be able to launch the ddclient service by by executing:
usr/sbin/ddclient -daemon 300 -syslog
You can place it in your startup scripts so that in the future you will only need to write:
sudo service ddclient start
Now you should be able to check if it is correctly running by lauching
sudo service ddclient status

● ddclient.service - LSB: Update dynamic domain name service entries
Loaded: loaded (/etc/init.d/ddclient)
Active: active (running) since vie 2017-11-24 22:27:59 CET; 1 months 1 days ago
CGroup: /system.slice/ddclient.service
└─918 ddclient - sleeping for 190 seconds
Testing DDClient
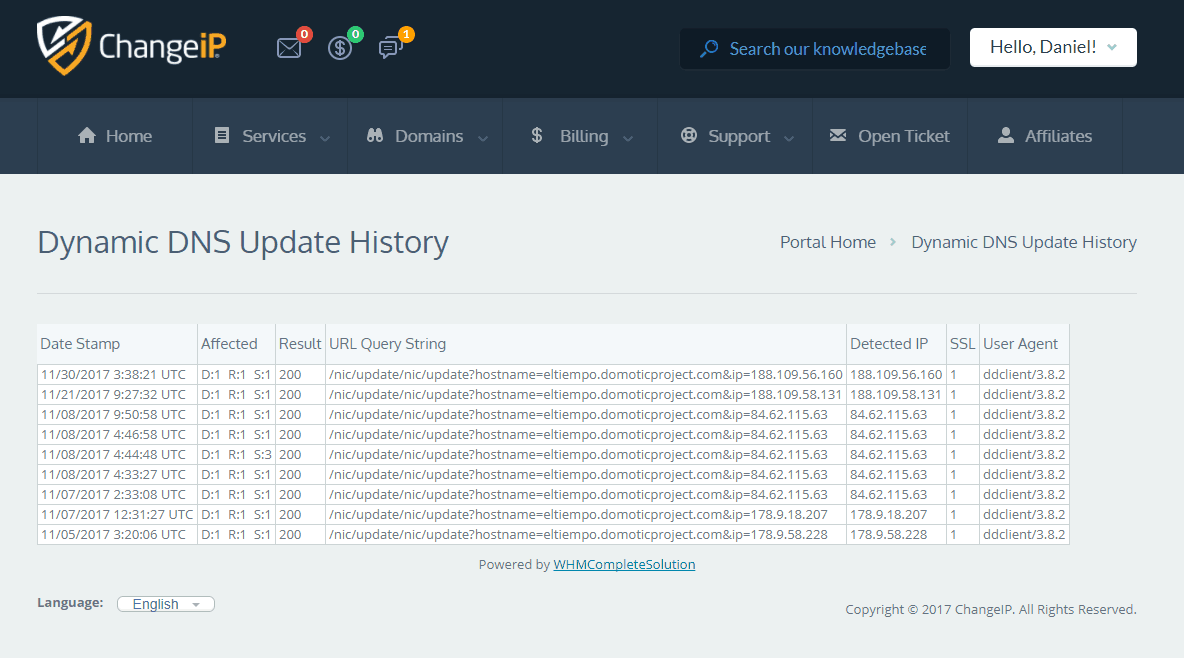
With IPChange you can easily check the last IP updates by accessing the following site (DDNS Update History). Here you can see the last IPs updated by your domain. If you want to check if it is working correctly after a change of IP, restart your router manually (switching it off for a couple of minutes to force the external IP renovation). After a few minutes you should see a new entry in this table.
If your IP is not updated you need to check the error messages of ddclient by running:
sudo ddclient -daemon=0 -verbose -noquiet -debug
and/or
sudo ddclient -query
This two commands should help you to find where your problem is. DDClient manual is not very clear, so if you get any trouble you will probably need to google it, read the example configurations included in the installation or run the help ddclient --help to get more help.
Port Forwarding
By this time you should be able to reach from an external internet connection your router IP address by using the host name decided. However, as you can see with a short test, you cannot contact your Raspberry yet. This is because your router does not know to which internal IP the data packages received from the internet need to be sent. You can solve this problem by using port mapping/forwarding. This procedure will allow remote computers to connect to a specific device within your private LAN.
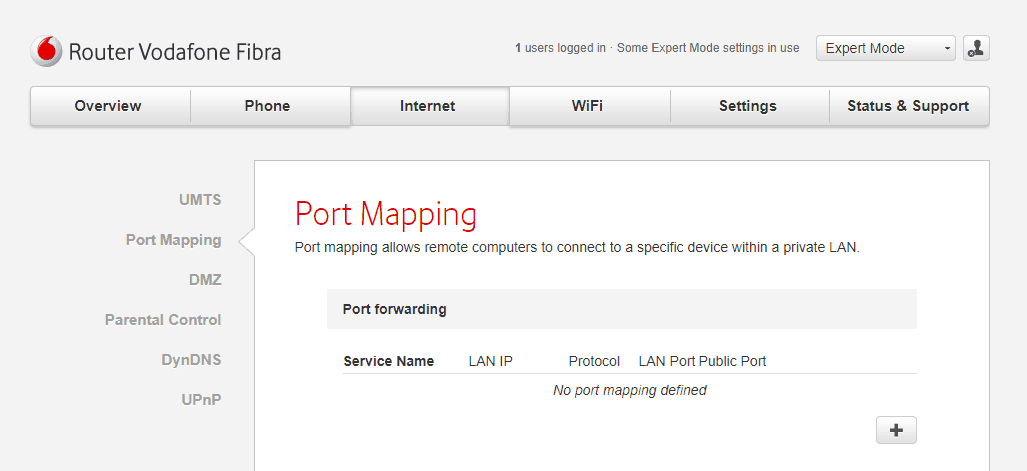
You need to add a rule for each service/port you want to be reached from the internet. For instance, if you want to allow your SSH server to be reached from internet, you have to add a configuration like the following, updating the public and LAN port by the one used by SSH.
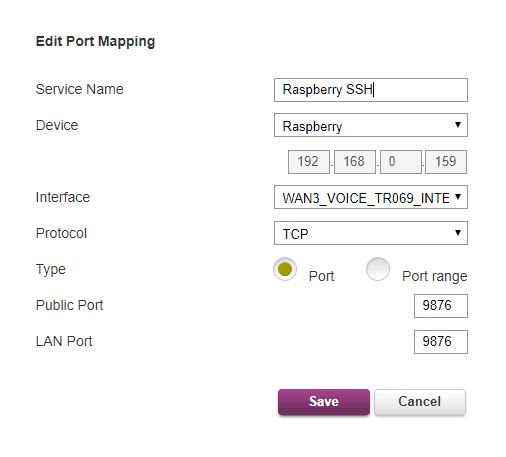
With this activated, you will be able to make the combination of devices and services configured publicly accessible over the internet. You can test it with your mobile phone, disconnecting it from your WiFi and trying to perform an SSH connection (using Juice SSH or any other SSH Client).
Demilitarized Zone
There is an alternative to forwarding specific ports to internal IP, and it is using a Demilitarized Zone (DMZ). A home router DMZ host is a host on the internal network, in our case a Raspberry Pi, that has all UDP and TCP ports open and exposed, except those ports otherwise forwarded. This is a simple method to forward all ports, leaving the host behind the router firewall. By using this method, all the ports (and services) of your Raspberry will be directly accessible from the internet, with the high security risks that this implies. From my point of view, it is a much better solution to forward only the specific ports that you use. Importantly, if you choose a DMZ, remember to configure a firewall in your Raspberry Pi, as commented in this post.

I made an easy free DDNS client that you might be interested in http://www.pi-dns.me
It seems very interesting Simon, thanks for sharing.
Thank you, Simon! I just set up ssh on my pi in no time at all.
Also thank you, Dani, for the post. I would have gone down that “route” ;)!