Contents
Introduction
I use at home a couple of sets of 433MHz remote-controlled power sockets to switch on and off some ambient lights. These lights are managed with a couple of tiny remote controller that used to be lost between the sofa’s cushions almost all the time. I though it will be interesting to remotely control this lights from the Raspberry Pi. In this tutorial you will see how to use a cheap transmitter hooked up to a Pi to interact with devices operating on the commonly used 433MHz radio frequency band.
433MHz modules
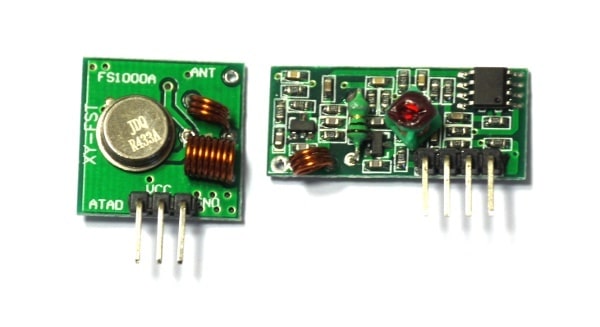
There are lots of 433 Mhz modules compatible with Raspberry and all of them should work perfectly fine. Before buying one, check that they use the 433 MHz frequency. Note that they are usually sold in pairs (receiver + transmitter). For this project you will need to use the receiver shorty to discover the codes associated with each power socket. Once this information is known, only the transmitter component will be used.
The 433MHz Receiver
The first step is to connect the receiver with the Raspberry Pi. As previously commented, we will only use the receiver to know which code is associated with each button of the remote controller. Connecting the module with your Raspberry Pi is really simple. All the Pis have a row of GPIO (general-purpose input/output) pins along the top edge of the board. Any of the GPIO pins can be designated (in software) as an input or output pin and used for a wide range of purposes. In the following image you can see the meaning and function of the GPIO pins.
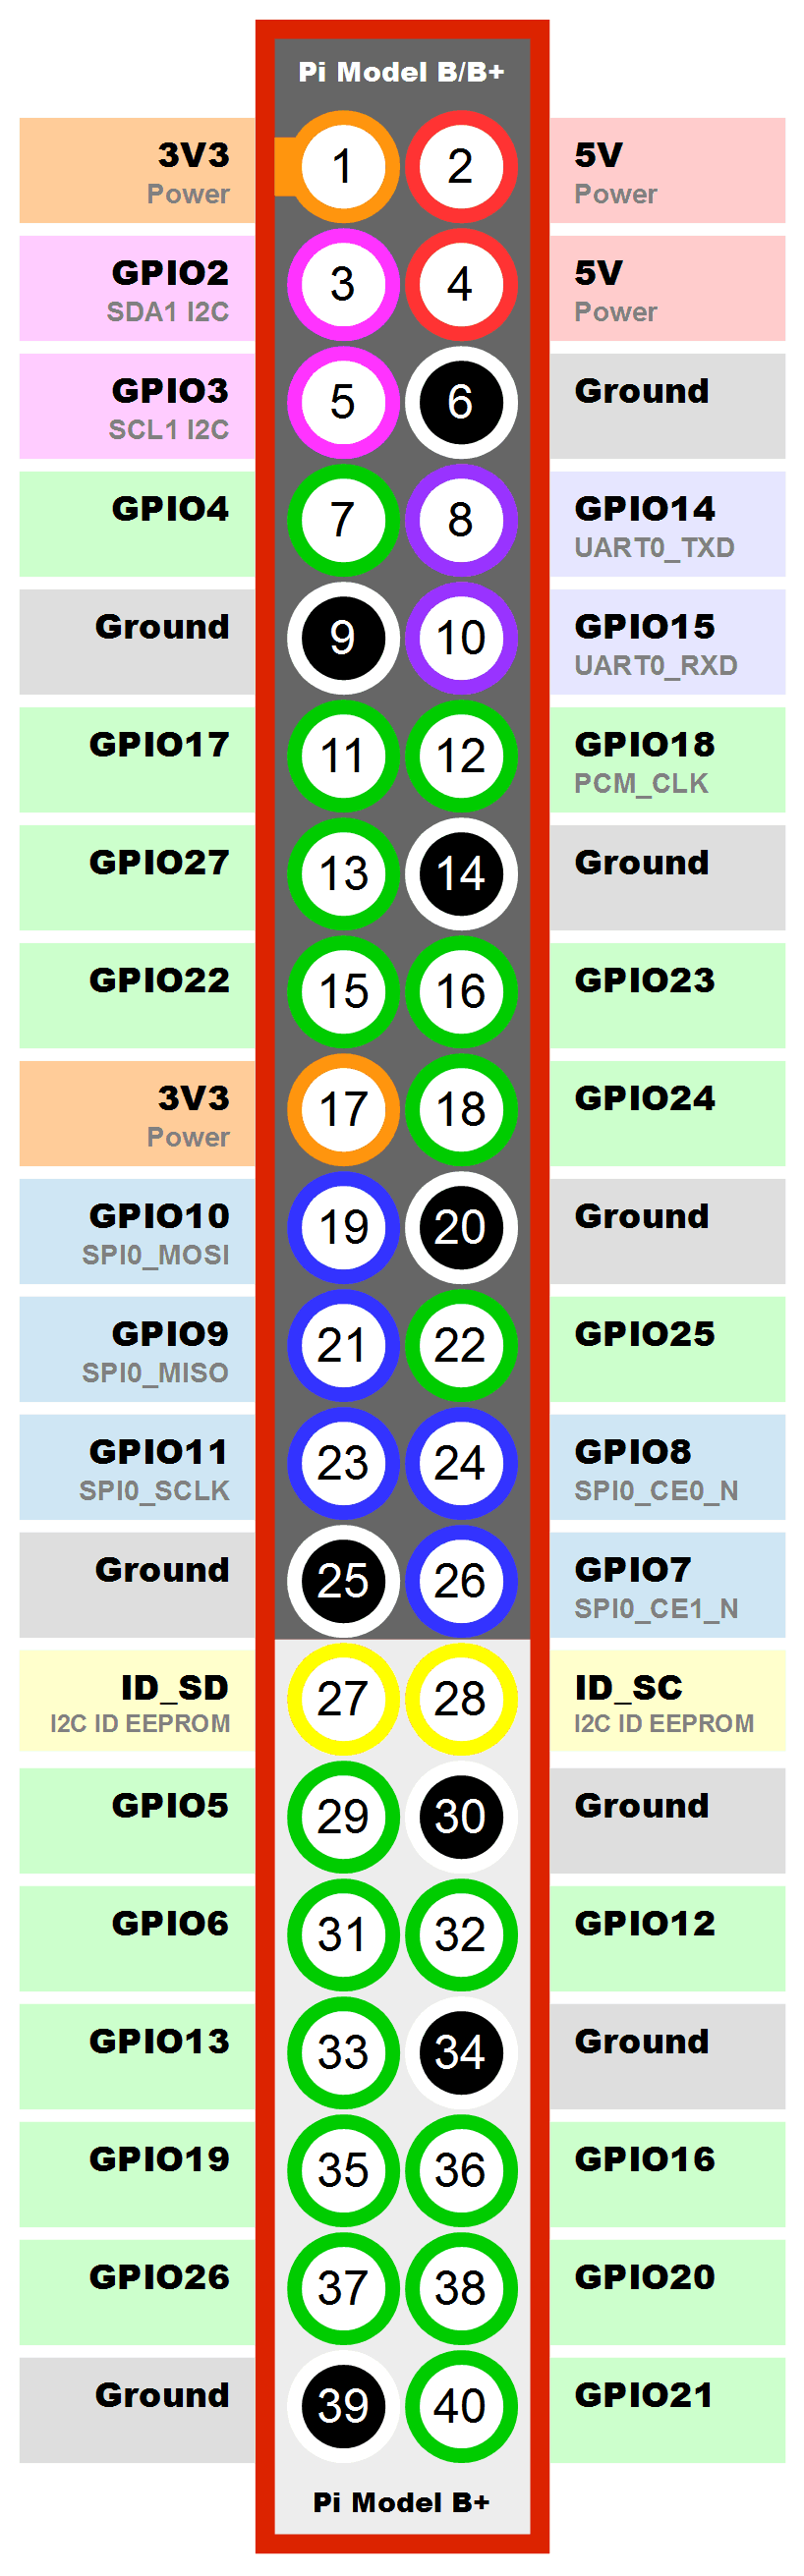
To start playing you should only provide voltage (5 volts) to the receiver VCC pin, connect any of the available grounds to the GND pin and pair the DATA pin with your desired GPIO pin. You can use jump/dupont cables and a breadboard to perform the connections easily.
The 433MHz Transmitter
The connections of the transmitter are as easy as those of the receiver. Just use a different GPIO pin. As you could see in the previous image, the transmitter usually does not include an antenna so do not expect to have a big range in your sent signals. If the sockets that you are using are too far away from the transmitter and they do not detect it, there are alternative modules that include soldered antennas for a few more euros.
On the other hand, you can also build your own antenna in a similar way as I explained in this post. As the frequency used in the WMR-88 Weather Station was also 433 MHz, we can reuse the calculations done. However, the WMR88 had a reflective plane normal to the antenna acting as a dipole. Without this plane, the quarter wave antenna will not work properly. The solution, is to use a kind of half wave dipole antenna with a length equal to half the wavelength of the signal (34.62cm). I recommend using copper wire with a diameter of 1,33 or 1,55 mm (16-18 gauge). Roll the wire wrapped around a 2.5mm core and solder it to the ANT pin.
Software
Installing rpi-rf
Once connected with your Pi, you can use one of the multiple RF libraries to start listening the codes received by the RF module. I would recommend you, because of its ease of use and wide compatibility, the rpi-rf Python module available via pip.
Before installing it, check on this list if the chipset used by your remote controller is supported by the library. The simpler your remote controller is, the more probable the library will work. Basic modules with hard-coded codes will work without problems. You may find difficulties with new RF 433 Mhz devices that use dynamic codes to avoid collisions. Even if your device does not appear in the list, you should try. If it does not work, have a look on the internet for other libraries.
To install the library just do (considering Python3 is already installed):
apt-get install python3-pip
pip3 install rpi-rf
Using rpi-rf
The Python module installs two scripts to interact with the 433 Mhz devices: pi-rf_receive to capture signals and pi-rf_send to transmit signals. Let’s start sniffing the codes captured by the receiver with the following command (changing the -g parameter, GPIO port, for the one used in your installation) and start pressing one of the remote controller buttons.
rpi-rf_receive -g 15
2018-06-22 11:27:41 - [INFO] rpi-rf_receive: Listening for codes on GPIO 15
2018-06-22 11:27:41 - [INFO] rpi-rf_receive: 6 [pulselength 205, protocol 1]
2018-06-22 11:27:41 - [INFO] rpi-rf_receive: 6 [pulselength 205, protocol 1]
Note that each time you press the button, the sniffer print outs the code received. If nothing is printed double check your connections. If every time you press a button you read a different value, probably this library is not compatible with your installation. Write down the codes associated with each button, as well as the pulse length and protocol detected. Once finished, try to send a signal to one of your remote switches with the following command:
rpi-rf_send -g 16 -p 205 -t 1 6
If everything works fine, your switch should turn off or on with every signal send. It is possible that some signals are lost, depending on the RF noise. Try to reduce the noise by separating your transmitter from WiFi access points, fluorescent light ballasts, LED lamps or TVs as much as possible. Otherwise, resend every signal several times to ensure that it is received correctly.
Developing a PHP Wrapper
I have developed a PHP Wrapper in the server that uses the rpi-rf module to turn off and on the lights. The code uses POST variables (application/x-www-form-urlencoded) to choose which signal should be sent.
To ensure that the RF module is used in a sequential way and that two requests do not try to access the transmitter module at the same time, I have used semaphores. Those are a part of the System V IPC family of functions and are used to provide exclusive access to resources on a machine, or to limit the number of processes that may simultaneously use a resource. To activate the use of semaphores in PHP, you should first recompile it --enable-sysvsem option. A semaphore is first created with $sem_id = sem_get(RF_SEMAPHORE). Two calls to this function with the same key RF_SEMAPHORE will return a different semaphore identifier, but both identifiers will access the same underlying semaphore. Function sem_acquire() blocks (if necessary) until the semaphore can be acquired, while sem_release() releases the semaphore if it is currently being acquired by the calling process.
The following code corresponds to the PHP wrapper developed. It can be found also in this gist. It will first acquire the semaphore and send the selected signal three times. If you want to use it, just adapt the $lightCode and $lightCodeDuration variables to match the values obtained while testing your receiver buttons.
<?php

	function sendRF($lightId, $lightStatus) {

		global $lightCode;
		global $lightCodeDuration;

		$sem_id = sem_get($RF_SEMAPHORE);

		sem_acquire($sem_id);

		$unixCommand = "sudo rpi-rf_send -g 22 -p ".$lightCodeDuration[$lightId]." -t 1 ".($lightCode[$lightId]+$lightStatus). " 2>&1";

		for ($i = 1; $i < RESEND_TIMES; $i++) {
			shell_exec ($unixCommand);
		}

		sem_release($sem_id);

	}

	# define constants
        define('RF_SEMAPHORE', 30);
	define('RESEND_TIMES', 3);

	//                         0,            1,   2,        3,     4,                5,         6
	//                        entrada, lectura,  tv, calduino, verde, deshumidificador, multiusos
	$lightCode=		array(  6,     10,  14,    83028, 86100,             70740,     21588);
	$lightCodeDuration=	array(205,    205, 205,      355,   355,               355,       355);

	/* if started from command line, wrap parameters to  $_POST */
	if (!isset($_SERVER["HTTP_HOST"])) {
	  parse_str($argv[1], $_POST);
	}

	if (isset($_POST["parameter"]))
	{
		$parameter = $_POST["parameter"];
	} else {
		$parameter = null;
	}

	switch ($parameter) {

		case "sendToRF":
			$lightId = $_POST["lightId"];
			$lightStatus = $_POST["lightStatus"];
			sendRF($lightId, $lightStatus);
			break;
	}

?>
Troubleshooting
If you try to call rpi-rf_send command with user www-data you will probably get the following error:
Traceback (most recent call last):
File "/usr/local/bin/rpi-rf_send", line 23, in
    rfdevice.enable_tx()
File "/usr/local/lib/python3.4/dist-packages/rpi_rf/rpi_rf.py", line 77, in enable_tx
    GPIO.setup(self.gpio, GPIO.OUT)
RuntimeError: No access to /dev/mem.  Try running as root!
For security reasons www-data user (under which apache2 runs) is not allowed to access GPIO pins. To solve this issue you can edit the /etc/sudoers file and allow user www-data to run rpi-rf_send command as root. Do that by adding the following line to sudoers file:
...
Cmnd_Alias PHPCOMMANDS=/usr/local/bin/rpi-rf_send
www-data ALL=(ALL) NOPASSWD: PHPCOMMANDS
...
In case you need it, you can add more commands separated by comma to PHPCOMMANDS variable. This will allow user www-data to run from any device without password the executables included in PHPCOMMANDS. To reload this configuration file just run service sudo reload.
HTML/Javascript code
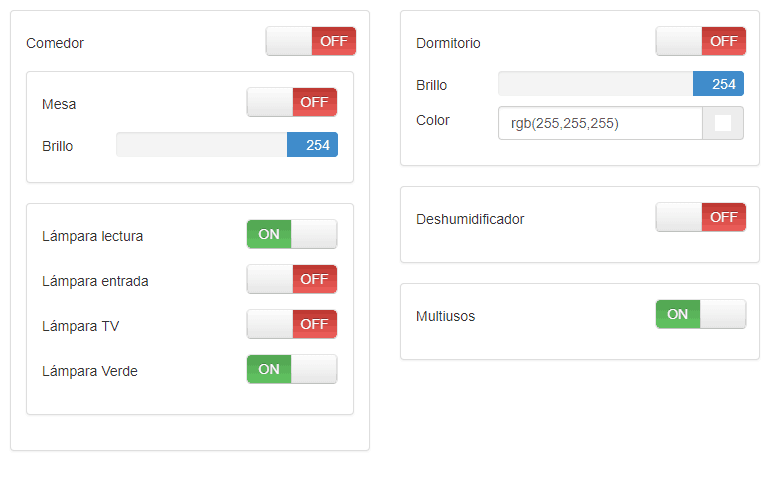
I have used Bootstrap Swtich to create nice buttons to control the RF sockets. To use them in your web page, just include the dependencies: jQuery, Bootstrap and Bootstrap Switch CSS and Javascript:
<link rel="stylesheet" href="https://cdnjs.cloudflare.com/ajax/libs/ekko-lightbox/5.2.0/ekko-lightbox.css" integrity="sha256-rsCgM5jt7IFLYMFFsDe3ZDSnL1fX0IKF5DOQP9q11kQ=" crossorigin="anonymous" />
<link rel="stylesheet" href="https://maxcdn.bootstrapcdn.com/bootstrap/3.3.7/css/bootstrap.min.css" integrity="sha384-BVYiiSIFeK1dGmJRAkycuHAHRg32OmUcww7on3RYdg4Va+PmSTsz/K68vbdEjh4u" crossorigin="anonymous">
<link rel="stylesheet" href="https://cdnjs.cloudflare.com/ajax/libs/bootstrap-switch/3.3.4/css/bootstrap2/bootstrap-switch.min.css" integrity="sha256-om6WdVA9jl2Y5FpRyiHQWboI3PRXcY9SDh9UuYOxRtA=" crossorigin="anonymous" />
...
<script src="https://ajax.googleapis.com/ajax/libs/jquery/1.12.4/jquery.min.js"></script>
<script src="https://maxcdn.bootstrapcdn.com/bootstrap/3.3.7/js/bootstrap.min.js" integrity="sha384-Tc5IQib027qvyjSMfHjOMaLkfuWVxZxUPnCJA7l2mCWNIpG9mGCD8wGNIcPD7Txa" crossorigin="anonymous"></script>
<script src="https://cdnjs.cloudflare.com/ajax/libs/bootstrap-switch/3.3.4/js/bootstrap-switch.min.js" integrity="sha256-AKUJYz2DyEoZYHh2/+zPHm1tTdYb4cmG8HC2ydmTzM4=" crossorigin="anonymous"></script>
Create a checkbox:
<input id="tvCheckbox" name="tvCheckbox" type="checkbox" checked="checked" data-on-color="success" data-off-color="danger" data-size="normal" >
And initialise it:
$("[name='tvCheckbox']").bootstrapSwitch('state', false);
$('input[name="tvCheckbox"]').on('switchChange.bootstrapSwitch', function(event, state) { sendRF(2,state); });
In this case, the checkbox is initialised to false. When its status changes, the javascript function sendRF(2,state)is executed. This function will just call the PHP Wrapper previously seen:
function sendRF(lightId, state)
{
        var parameter = "sendToRF";
	var xmlhttp = new XMLHttpRequest();
	xmlhttp.open("POST", "RFWrapper.php", true);
	xmlhttp.setRequestHeader("Content-type", "application/x-www-form-urlencoded");
	xmlhttp.send("parameter="+parameter+"&lightId="+lightId+"&lightStatus="+(state==true?"1":"0"));
}