Contents
Introduction
Philips HUE is a domestic line of Wi-Fi-enabled color changing LED lamps. It was first introduced in October 2012 and has been updated both in 2015 and 2016, so one can say that it is a mature product. Of all the alternatives, and despite its price (15/20 € pro bulb), I think that HUE is the best smart lightning system. In this tutorial I will explain how to integrate HUE lights in your own domotic system/web server using acceding Philip’s API through cURL.
How HUE Works?
The Hue lighting system is based on a central node, the Hue Bridge, which is connected to the router through a LAN cable. The Bridge communicates with the bulbs using Zigbee Light Link standard (and Zigbee 3.0, a recent update released in 2018). The Bridge implements a very good documented REST API (access requires login) though port 80. The HUE can be configured to be accessible from outside the local LAN, however due to previous security issues with HUE products, I decided to disable this functionality. By this way, only devices inside the local network will be able to control my home lights.

To tell the true, in order to control your HUE lights, the Bridge is not 100% needed. You can access directly the bulbs sending RF Zigbee signals from a Raspberry Pi compatible module. However I think that the (approximately) 50 € that the Bridge costs is a reasonable price that will avoid headaches trying to hack the only partially documented protocol used internally by the Bridge.
Find HUE Bridge IP
In order to be able to talk with the Bridge, you will first have to find which IP the router has assigned to it. There are a number of ways of doing this as described in this link. The easiest way is, from my point of view, to use the Bridge’s mDNS capabilities. First of all, you will need to install a service discover client. I have used avahi package. Once installed, use it to find the IP announced by the Bridge’ service:
apt-get install avahi-utils
...
avahi-browse -rt _hue._tcp

+   eth0 IPv6 Philips Hue - XXXXXX                          _hue._tcp            local
+   eth0 IPv4 Philips Hue - XXXXXX                          _hue._tcp            local
=   eth0 IPv6 Philips Hue - XXXXXX                          _hue._tcp            local
   hostname = [Philips-hue.local]
   address = [192.168.X.Y]
   port = [80]
   txt = ["modelid=bsb002" "bridgeid=ZZZZZZZZZZZZZZZ"]
=   eth0 IPv4 Philips Hue - XXXXXX                          _hue._tcp            local
   hostname = [Philips-hue.local]
   address = [192.168.X.Y]
   port = [80]
   txt = ["modelid=bsb002" "bridgeid=ZZZZZZZZZZZZZZZ"]
Note: This should work if your Bridge version is 2.0 (the square one).
As you can see, the Bridge announces its services twice, using IPv4 and IPv6. Write down the IP. I would recommend you assigning a static IP to the Bridge. In this post I explained how to do that in an EasyBox 904 xDSL router. Other devices will probably need different (although similar) steps. In all cases you will probably need your Bridge’s MAC. To figure it out just type:
arp -a <BRIDGE_IP>

Philips-hue (192.168.X.Y) at 00:XX:YY:ZZ:AA:BB [ether] on eth0
Get a valid user
REST APIs are stateless. It means that the response from the server is independent of any sort of state (and of any previous request). However, to start talking with the HUE you will first need a valid user that authorizes the use of the API. This valid user is generated by pressing the Bridge’s physical button and then posting a request with the following content (replace YOUR_USER_ID by any identifier that you want, it will not be used anymore):
curl -d '{"devicetype":"[<YOUR_USER_ID>]"}' -H "Content-Type: application/json" -X POST 'http://<BRIDGE_IP>/api'


[
	{
		"success":
                {
			"username": "[<YOUR_USERNAME>]"
		}
	}
]
Write down the username generated by your Bridge, you will have to authenticate each request with it. Let’s do a short trial. Send the following command to obtain the list of available bulbs, as well as their current status:
curl 'http://<BRIDGE_IP>/api/<YOUR_USERNAME>/lights


{"1":{"state":{"on":false,"bri":254,"alert":"none","mode":"homeautomation","reachable":true},"swupdate":{"state":"noupdates","lastinstall":"20171:19"},...
Copy and paste the response received in a JSON Parser to read it in a more comfortable way. You should obtain a numbered list of lights. If you have previously named your bulbs (using Android or iPhone HUE App), you will find this information in the list of attributes returned. Identify now each light with the number assigned by the Bridge. You will have to use this number as the bulb’s identifier.
Controlling lights
Once you know your light’s ID, let’s see how to manipulate them. The simplest scenario is to turn on a light. To do so, just send the following web request. If everything works fine you should receive a response containing a confirmation of the arguments passed in and, of course, the light will turn on.
curl -X PUT -H 'Content-Type: application/json' -d '{"on":true}' 'http://<BRIDGE_IP>/api/<YOUR_USERNAME>/lights/<YOUR_LIGHT_ID>/state'

[{"success":{"/lights/<YOUR_LIGHT_ID>/state/on":true}}]
Depending on the type of bulb, you can also control other parameters. You can find which are configurable by looking at the state attribute of the light. For instance, you can control only bright and color temperature in A19 White bulbs, while you can also define the saturation and the exact color of the light in the color ambience models.
curl 'http://<BRIDGE_IP>/api/<YOUR_USERNAME>/lights/<YOUR_LIGHT_ID>'
{"state":{"on":true,"bri":254,"ct":366,"alert":"none","colormode":"ct","mode":"homeautomation","reachable":false},

curl 'http://<BRIDGE_IP>/api/<YOUR_USERNAME>/lights/<YOUR_LIGHT_ID_2>'
{"state":{"on":true,"bri":254,"hue":14988,"sat":141,"effect":"none","xy":[0.4575,0.4101],"ct":366,"alert":"none","colormode":"ct","mode":"homeautomation","reachable":false},
Defining the color of a light bulb is a little bit more complicated than just turning it on. The color point of a light has lots of ways of being quantified. HUE accepts a couple of them, being the most complete the use of x/y coordinates of the color in the CIE color space. The following image shows the chromaticity diagram of CIE color space. The three triangles (gamut A, B and C) outline the colours which hue can address depending on the bulb used. Have a look at this link to find out your light’s gamut.
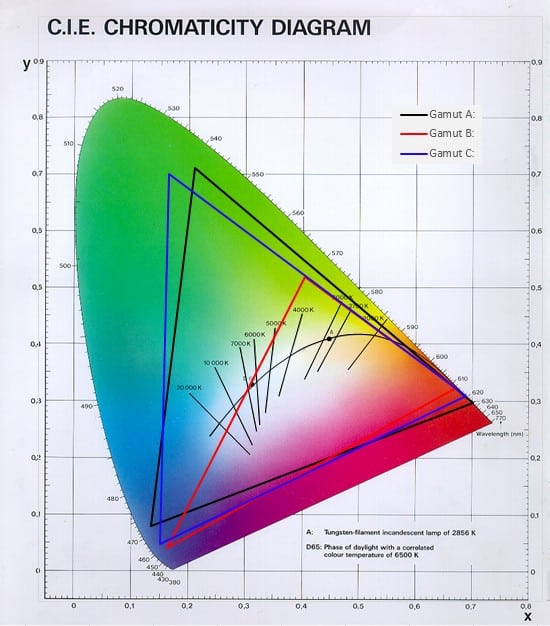
If you locate the coordinates [0.7, 0.3] you will see red color. To change the color of a light to this tone of red, send the following request:
curl -X PUT -H 'Content-Type: application/json' -d '{"on":true, "bri":10, "xy":[0.7,0.3]}' 'http://<BRIDGE_IP>/api/<YOUR_USERNAME>/lights/<YOUR_LIGHT_ID>/state'

[{"success":{"/lights/<YOUR_LIGHT_ID>/state/on":true}},{"success":{"/lights/<YOUR_LIGHT_ID>/state/xy":[0.7,0.3]}},{"success":{"/lights/<YOUR_LIGHT_ID>/state/bri":10}}]
Beside individual lights, groups of bulbs can also be controlled. First of all, the elements that belong to the group should be defined. It can be done sending requests (have a look at the API documentation) or, much easier, using HUE’s App. To turn on a group of lights with blue color, send the following request:
curl -X PUT -H 'Content-Type: application/json' -d '{"on":true, "bri":10, "xy":[0.1691,0.0441]}' 'http://<BRIDGE_IP>/api/<YOUR_USERNAME>/groups/<YOUR_GROUP_ID>/action'

[{"success":{"/groups/<YOUR_GROUP_ID>/action/on":true}},{"success":{"/groups/<YOUR_GROUP_ID>/action/bri":10}},{"success":{"/groups/<YOUR_GROUP_ID>/action/xy":[0.1691,0.0441]}}]
A Web interface to control you lights
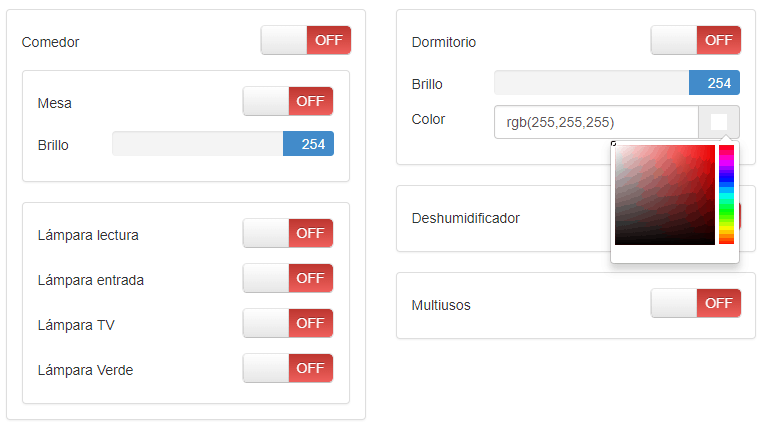
I have integrated in my domotic web page a simple form that allows me control the HUE lights remotely. The form integrates the 433 MHz remote switches explained in this post too. I have followed Bootstrap framework (HTML5 and Javascript with AJAX requests) and PHP in the server side. By doing so, the Raspberry Pi receives commands and serves them using PHP and the libcurl library. I have used Bootstrap Swtich and Boostrap Color Picker libraries to create nice buttons.
This is a simple example to manage a light group with both color and bright controls. The HTML code is as follows:
<div class="panel panel-default"> <div class="panel-body"> <div class="row" style="margin-bottom: 10px;"> <div class="col-xs-4 "> <h5>Dormitorio</h5> </div> <div class="col-xs-4 pull-right"> <div class="bootstrap-switch-normal bootstrap-switch bootstrap-switch-wrapper bootstrap-switch-off bootstrap-switch-animate" style="width: 92px;"><div class="bootstrap-switch-container" style="width: 134px; margin-left: -44px;"><span class="bootstrap-switch-handle-on bootstrap-switch-success" style="width: 44px;">ON</span><span class="bootstrap-switch-label" style="width: 46px;"> </span><span class="bootstrap-switch-handle-off bootstrap-switch-danger" style="width: 44px;">OFF</span><input name="dormitorioCheckbox" type="checkbox" checked="checked" data-on-color="success" data-off-color="danger" data-size="normal"></div></div> </div> </div> <div class="row" style="margin-bottom: 10px;"> <div class="col-xs-12"> <div class="col-xs-3 no-padding"> <h5 style="margin-top: 7px; margin-bottom: 0px;">Brillo</h5> </div> <div class="col-xs-9 no-padding"> <div class="range range-primary"> <input type="range" id="dormitorioBrightnessInput" name="dormitorioBrightnessInput" min="0" max="254" value="0" oninput="dormitorioBrightnessOutput.value=value" onchange=""> <output id="dormitorioBrightnessOutput">10</output> </div> </div> </div> </div> <div class="row" style="margin-bottom: 10px;"> <div class="col-xs-12"> <div class="col-xs-3 no-padding"> <h5 style="margin-top: 7px; margin-bottom: 0px;">Color</h5> </div> <div class="col-xs-9 no-padding"> <div id="dormitorioColorPicker" class="input-group colorpicker-component colorpicker-element"> <input type="text" value="#ffffff" class="form-control"> <span class="input-group-addon"><i style="background-color: rgb(255, 255, 255);"></i></span> </div> </div> </div> </div> </div> </div>
The following javascript will send an AJAX request to a PHP Wrapper named HUEWrapper.php . The method sendToHue() creates an XMLHttpRequest object to interact with the server. The request’s URL query string will contain three parameters: the operation to be performed, the light status desired, the light bright and the light color. Similarly, the method getFromHue() will get the current status of the light.
<script src="https://cdnjs.cloudflare.com/ajax/libs/bootstrap-switch/3.3.4/js/bootstrap-switch.min.js" integrity="sha256-AKUJYz2DyEoZYHh2/+zPHm1tTdYb4cmG8HC2ydmTzM4=" crossorigin="anonymous"></script>
<script src="https://cdnjs.cloudflare.com/ajax/libs/bootstrap-colorpicker/2.5.1/js/bootstrap-colorpicker.min.js" integrity="sha256-/48jq3JSvRjSX+/bZosYmT29RkZk4lPukj1HKRfABU4=" crossorigin="anonymous"></script>
<script src="https://maxcdn.bootstrapcdn.com/bootstrap/3.3.7/js/bootstrap.min.js" integrity="sha384-Tc5IQib027qvyjSMfHjOMaLkfuWVxZxUPnCJA7l2mCWNIpG9mGCD8wGNIcPD7Txa" crossorigin="anonymous"></script>

<script type="text/javascript">

	# Initialise the checkbox button and send commands to HUE Bridge when the event switchChange happens
	$("[name='dormitorioCheckbox']").bootstrapSwitch();
	$('input[name="dormitorioCheckbox"]').on('switchChange.bootstrapSwitch', function(event, state) {
		$('#dormitorioBrightnessInput').prop('disabled', !state);
		$("#dormitorioColorPicker").colorpicker((state==true)?'enable':'disable');
		sendToHue();
	});

    # Initialize the colorpicker button and send commands to HUE Bridge when the event changeColor happens
    $(function()
	{
        $('#dormitorioColorPicker').colorpicker({
            color: '#FFFFFF',
            format: 'rgb'
        });
    });

    $(function()
	{
        $('#dormitorioColorPicker').colorpicker().on('changeColor', function(e) {
            sendToHue();
        });
    });

	function sendToHue()
	{
		var operation = "sendToHue";
		var lightStatus = $('input[name="dormitorioCheckbox"]').bootstrapSwitch('state');
		var lightBright = $('#dormitorioBrightnessOutput').val();
		var lightColor = $('#dormitorioColorPicker').data('colorpicker').color.toHex();
		var xmlhttp = new XMLHttpRequest();
		xmlhttp.open("POST", "HUEWrapper.php", true);
		xmlhttp.setRequestHeader("Content-type", "application/x-www-form-urlencoded");
		xmlhttp.send("operation ="+operation +"&lightGroup="+lightGroup+"&lightStatus="+lightStatus+"&lightBright="+lightBright+"&lightColor="+lightColor);
	}

	function getFromHue(lightGroup){

		var parameter = "getFromHue";
		var xmlhttp = new XMLHttpRequest();
		xmlhttp.onreadystatechange = function() {
			if (this.readyState == 4 && this.status == 200) {
				var obj = JSON.parse(xmlhttp.responseText);
				if (lightGroup==2) {
					$('input[name="dormitorioCheckbox"]').bootstrapSwitch('state', obj.state.all_on);
					$('#dormitorioBrightnessOutput').val(obj.action.bri);
					$('#dormitorioBrightnessInput').val(obj.action.bri);
				}
			}
		};
		xmlhttp.open("POST", "HUEWrapper.php", true);
		xmlhttp.setRequestHeader("Content-type", "application/x-www-form-urlencoded");
		xmlhttp.send("parameter="+parameter+"&lightGroup="+lightGroup);
	}

</script>
Finally, the server will contain a PHP file that, using HUE’s API, modifies the bulb status. A couple of functions that will convert the color from hexadecimal format to x/y coordinates in the CIE colour space can be found in the code.
<?php

    /**
     * Get XY from Red, Blue, Green value.
     *
     * @param int $color Color value, number between 0 and 255.
     *
     * @return number
     */
    function convertColorToPoint($color)
    {
        $color = $color < 0   ? 0   : $color;
        $color = $color > 255 ? 255 : $color;
        return ($color > 0.04045) ? pow(($color + 1.055), 2.4) : ($color / 12.92);
    }

    /**
     * Converts Hex to RGB.
     *
     * @param string $hex Hex string.
     *
     * @return array Array of color values.
     */
    function hexToRGB($hex)
    {
        $hex = ltrim($hex, '#');

        list($rgb['red'], $rgb['green'], $rgb['blue']) = str_split($hex, 2);

        $rgb = array_map('hexdec', $rgb);

        return $rgb;
    }

    /**
     * Get XY Point from Hex.
     *
     * @param string $hex Hex string.
     *
     * @return array XY point.
     */
    function getXYPointFromHex($hex)
    {
        $rgb = hexToRGB($hex);
        return getXYPointFromRGB($rgb);
    }

    /**
     * Get XY Point from RGB.
     *
     * @param int $red   Integer between 0 and 255.
     * @param int $green Integer between 0 and 255.
     * @param int $blue  Integer between 0 and 255.
     *
     * @return array Array of xy coordinates.
     */
    function getXYPointFromRGB($rgb)
    {

        $rgb['red'] = convertColorToPoint($rgb['red']);
        $rgb['green'] = convertColorToPoint($rgb['green']);
        $rgb['blue'] = convertColorToPoint($rgb['blue']);

        $x = $rgb['red'] * 0.4360747 + $rgb['green'] * 0.3850649 + $rgb['blue'] * 0.0930804;
        $y = $rgb['red'] * 0.2225045 + $rgb['green'] * 0.7168786 + $rgb['blue'] * 0.0406169;
        $z = $rgb['red'] * 0.0139322 + $rgb['green'] * 0.0971045 + $rgb['blue'] * 0.7141733;

        if (0 == ($x + $y + $z)) {
            $cx = $cy = 0;
        } else {
            $cx = $x / ($x + $y + $z);
            $cy = $y / ($x + $y + $z);
        }

        return array($cx, $cy);
    }

	$bridgeHostname = '<YOUR_BRIDGE_IP>';
	$bridgeUsername = '<YOUR_USERNAME>';
	$waitTime = 250000;
	$curlTimeout = 5;

	// create a curl object to communicate with HUE Bridge
	$ch = curl_init();
	curl_setopt($ch,CURLOPT_TIMEOUT, $curlTimeout);
	curl_setopt($ch, CURLOPT_RETURNTRANSFER, 1);
	curl_setopt($ch, CURLOPT_FORBID_REUSE, 1);

	/* if started from commandline, wrap parameters to  $_POST */
	if (!isset($_SERVER["HTTP_HOST"])) {
	  parse_str($argv[1], $_POST);
	}

	$operation= $_POST["operation"];

	switch ($operation) {

		case "sendToHue":
			$lightGroup = $_POST["lightGroup"];
			$lightBright = $_POST["lightBright"];
			$lightStatus = $_POST["lightStatus"];
			$lightColor = getXYPointFromHex($_POST["lightColor"]);

			$groupAttributes = array(
			  'on'  => ($lightStatus=="true" || $lightStatus=="1")?true:false,
			  'bri' => (int) $lightBright, // max brightness is 254
			  'xy'  => $lightColor
			);

			$data_json = json_encode($groupAttributes);
			echo $data_json;

			$url = $bridgeHostname . "/api/" . $bridgeUsername ."/groups/{$lightGroup}/action";

			curl_setopt($ch, CURLOPT_URL, $url);
			curl_setopt($ch, CURLOPT_HTTPHEADER, array('Content-Type: application/json','Content-Length: ' . strlen($data_json)));
			curl_setopt($ch, CURLOPT_CUSTOMREQUEST, 'PUT');
			curl_setopt($ch, CURLOPT_POSTFIELDS,$data_json);
			usleep($waitTime);
			echo curl_exec($ch);
			curl_close($ch);
			break;

		case "getFromHue":
			$lightGroup = $_POST["lightGroup"];
			$url = $bridgeHostname . "/api/" . $bridgeUsername ."/groups/" . $lightGroup;

			curl_setopt($ch,CURLOPT_URL,$url);
			curl_setopt($ch, CURLOPT_RETURNTRANSFER, true);
			usleep($waitTime);
			$response  = curl_exec($ch);
			echo $response;
			break;

		default:
			break;
}

?>
Excellent article! Searched for quite a bit of time to find the relevant details about controlling through this hub. Many thanks!
Hi, thank you for this! Really informative
What is the lag between the raspberry pie and the light when this is implemented?
Hi Dan,
There is no added lag. It is like when you control your lights from the HUE app from your mobile. Your mobile sends the commands to the HUE bridge and the HUE bridge sends a Zigbee signal to the light. In this case, instead of the HUE app, your Raspberry will send the commands to the HUE bridge.
Regards,
Daniel