
Contents
Introduction
I started playing with my Raspberry almost a year ago. At the beginning I used it only as an entertainment centre to replace an old and very noisy HTPC. After some time I came up with the idea of connecting it to some gadgets that I have at home. Nowadays my Raspberry is the “core” of a small domotic system connected with a WMR88 Oregon Scientific Weather Station, a Buderus Logomatic EMS Boiler, an IP CAM HW0049 Wanscam, some RF 433 switches, a Philips HUE Bridge and a Roomba 770. In this blog I will explain the steps I followed to connect the Raspberry to each device, as well as the main difficulties I found.
The first step will be, of course, the installation and configuration of an OS in the Raspberry Pi. There are already a lot of quite good tutorials on Internet explaining in detail how to do this. I will just try to summarize the most important steps and to discuss the main difficulties that I found. If this does not match to your situation, I reccomend to follow the official documentation from Raspberry Pi Foundation.
Equipment
In this tutorial we will be using the following equipment:
- Raspberry Pi 3 Model B.
- HDMI cable.
- Keyboard and mouse.
- Micro SD card. It is very important to use a good quality card and to leave plenty of free space to prolong ist life. The minimum size will depend on the OS installed: NOOBS will need 8 GB, a Raspbian Lite version will need 4 GB, other distributions can run in much smaller cards. The card class is a very important parameter because it determines the sustained write speed for the card; a class 4 card will be able to write at 4MB/s, whereas a class 10 should be able to reach 10 MB/s. In this short article you can find recommendations to extend the life of your SD card.
- Micro USB power supply with minimum 2.1 A. Make sure you are using a good quality power supply. Use as well a good quality USB cable for the power supply (too long and bad quality cables can reduce the volts/watts received by your PI). You can check your power supply by measuring the voltage between the probing terminals TP1 and TP2 on the Raspberry Pi. It should never drop below 4.75V even when doing complex tasks. The raspberry will also show a lightning bolt in the upper right of the screen in case the power supply is unsuitable.


Download and burn
I decided to install a Raspbian Lite version, without desktop environment, to minimize the packets included as well as to free up some resources. The last version can be found here. Just click in the download zip button and choose a folder to save it. Do not extract the files, there is no need to.
I recommend Etcher to burn the image easily in the desired SD card, but you can use any other equivalent software. Just insert the SD card in your computer (note the drive letter allocated to it), open Etcher, select the image (zip file), select the drive and click flash. After a few minutes all the files will be transferred to your SD card. When this process has finished, remove the SD card safely and insert it into your Raspberry Pi.
First boot
Connect your HDMI, keyboard, mouse and RJ45 cable (if it is connected directly to your router or switch, otherwise you will need to configure a wifi connection to connect your Raspberry Pi to internet as explained here). Finally, power up the Raspberry.
After a few minutes Raspbian will be installed and raspi-config will come up. If not, just type:
sudo raspi-config
to access the configuration menu of your Raspberry.
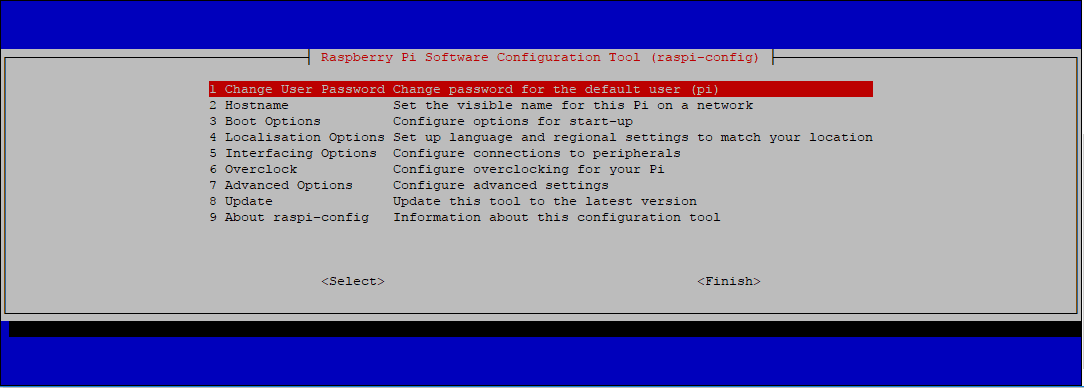
Basic configuration
The default user already installed is pi, its password is raspberry. I recommend to delete it and to create a new user as I explain in this post. If you prefer to keep the pi user, remember to change its password selecting the first option in the raspi-config menu. Otherwise somebody will be able to connect to your machine using ssh .
You can also change the hostname to make it easier to recognize your Raspberry in your network.
Choose in the boot options whether to wait for network at boot or not. By default, the Raspbian boot process runs as quickly as possible. This can mean that the boot completes before a network connection is up and running, causing problems in some applications that run at boot. In my particular case, I found that after an electrical failure/unexpected restart, the NTP client was providing inaccurate times because it was trying to update without an available network connection (and the Raspberry lacks of a hardware clock). You can also choose in this menu item if you want to allow autologin as well as whether to boot into desktop or in console mode.
It is important to select in the localisation options the regional settings that match your location (for Spain, for instance, I generated es-ES.UTF-8) as well as your time zone.
In the interfacing options enable the ssh connection if you are going to connect remotely to your Raspberry (more information about ssh in this post).
WiFi connection
To set a WiFi connection using the command line start typing:
sudo iwlist wlan0 scan
You will obtain a list of all available WiFi networks with a lot of technical information. Just check that your own wireless network appears listed and is correctly detected by your Raspberry Pi. Once checked open the wpa-supplicant configuration file with vi or your preferred text editor:
sudo vi /etc/wpa_supplicant/wpa_supplicant.conf
Next you should go to the bottom of the file and add the corresponding configuration for your network:
network=
{
 ssid="YourSSID"
 psk="YourPassword"
 id_str="YourNetworkIdentifier"
}
Reconfigure the interface running the following command:
sudo wpa_cli -i wlan0 reconfigure
In a couple of seconds it should be connected. You can verify if the connection has been established successfully by typing:
sudo ifconfig wlan0
The inet addr field should have an address if your Raspberry Pi is connected to the network. Otherwise, check your password and SSID in the wpa_supplicant.conf file.
Next steps with your Raspberry
That is all for the time being. By now you should have a working Raspberry Pi with its default configuration. There are still a few more interesting options in this raspberry configuration utility. However, I will comment them in further posts.
5 thoughts on “Installing Raspbian in Raspberry Pi”