Contents
Introduction
The Rasperry Pi does not have an on-board battery powered clock. While it is connected to internet, a NTP daemon updates the clock correctly. Otherwise, a fake-hwclock saves the current clock periodically to disk and loads it at startup. So, with high probability, after a power shortage the Raspberry Pi time will be inaccurate. For some people this behavior will be good enough, however if you are logging weather information this will be certainly a problem. This can be easily solved using a Real Time Clock (RTC) module that will keep the time when the Raspberry is turned off. When the Raspberry reboots, it can set it’s own internal clock using the time held in by the RTC. In this tutorial I will explain how to install and configure this module in your Raspberry Pi.
Which RTC module?
There are a lot of RTC modules available on the market. Before buying, you should evaluate this points:
- The chipset mounted. From my research, I saw that the more common chips are the DS1307 and DS3231. However, this last one is compatible with 3 V and includes an integrated temperature-compensated oscillator, resulting in a higher accuracy.
- Another important aspect is the pin out of the device. Some modules can be attached directly to the Pi’s GPIO header, while others will require jumpers. It is up to you to decide if you want to keep the GPIO clear for other purposes.
- Finally, some devices are powered by button cells, while others uses capacitors. Capacitors are recharged by the Raspberry Pi but will not be able to power the module as long as a button cell do. On the contrary, button cells do not warn about their low capacity, so you will have to perform active maintenance and replace it from time to time. To sum up, if your system is going to be continuously running, I would recommend to use a capacitor. If it will be off for long periods of time, it would be a better idea to use a button cell.
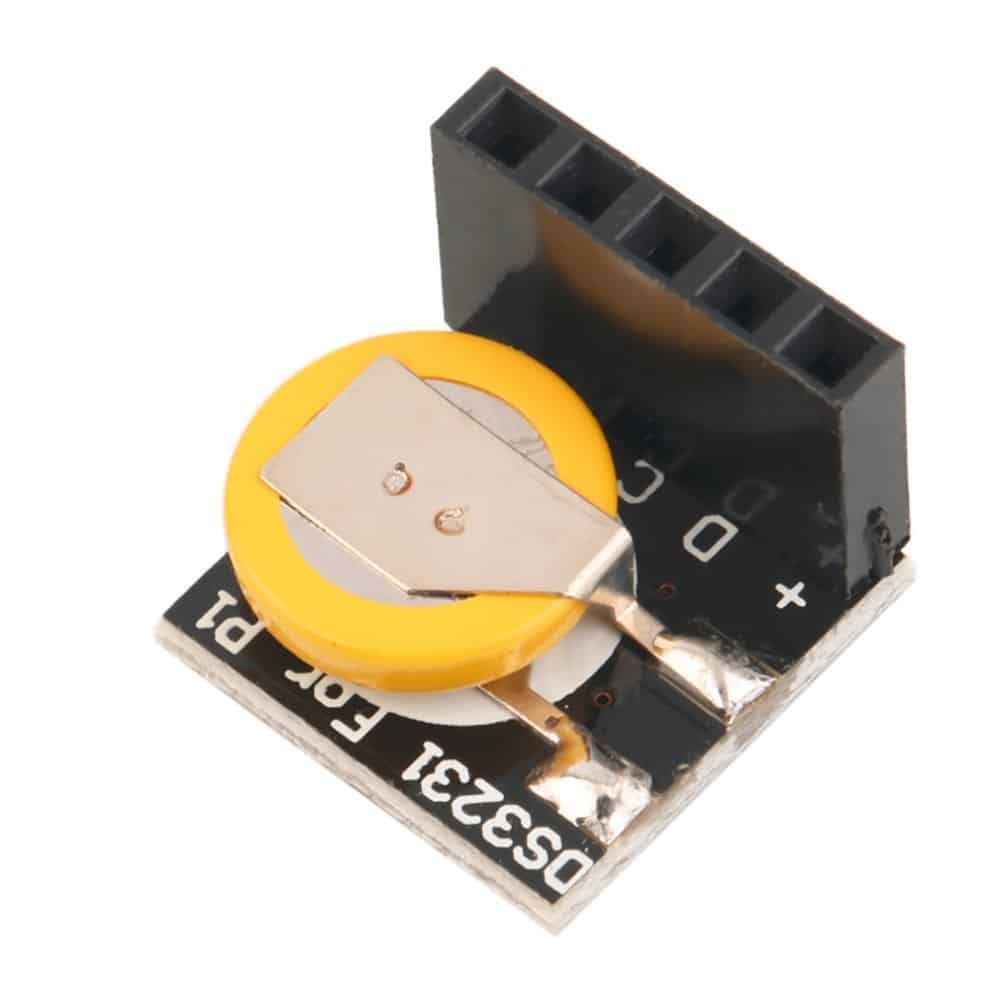
I personally have used a DS3231 module with capacitor and GPIO ready, available in amazon in this link.
DS3231 Module Setup
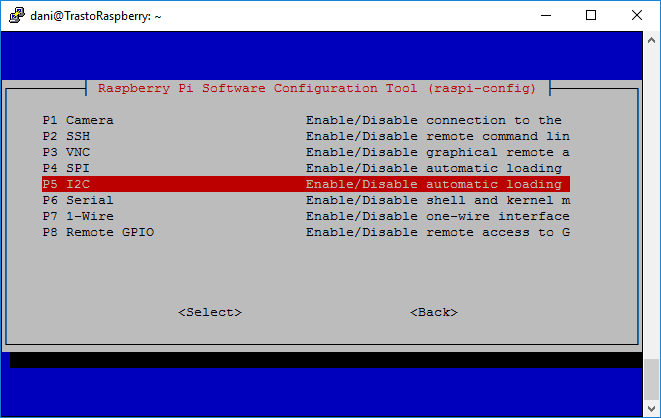
The default Raspbian image disables I2C by default so before you can use it the interface must be enabled. The raspi-config can be used to enable it. Start by running:
sudo raspi-config
- Use the down arrow to select 5 Interfacing Options.
- Arrow down to P5 I2C.
- Select yes when it asks you to enable I2C.
- Use the right arrow to select the <Finish> button.
- Select yes when it asks to reboot.
This operation will only add a line in the file /boot/config.txt. You can manually activate the I2C hardware interface by including manually the line dtparam=i2c_arm=on. In any case, you should also include the dto-overlay so your file should contain this two lines:
sudo vi /boot/config.txt

...
dtparam=i2c_arm=on
...
dtoverlay=i2c-rtc,ds3231
...
With these changes, in the next restart the RTC driver will be compiled as a module. However, the kernel will not initialise automatically the system clock from the RTC because the kernel configuration item CONFIG_RTC_HCTOSYS is not correctly set. To solve that problem there is a workaround editing the file /lib/udev/hwclock-set to avoid the detection of systemd, which prevents the initialisation of system clock from RTC. Just comment out this three lines:
sudo vi /lib/udev/hwclock-set

#if [ -e /run/systemd/system ] ; then
# exit 0
#fi
Remember that the change will get overwritten whenever the util-unix package is updated. Shutdown now your system and connect the unit to your Raspberry Pi following the indications of the next point.
sudo shutdown -h now
Connection to the I2C bus
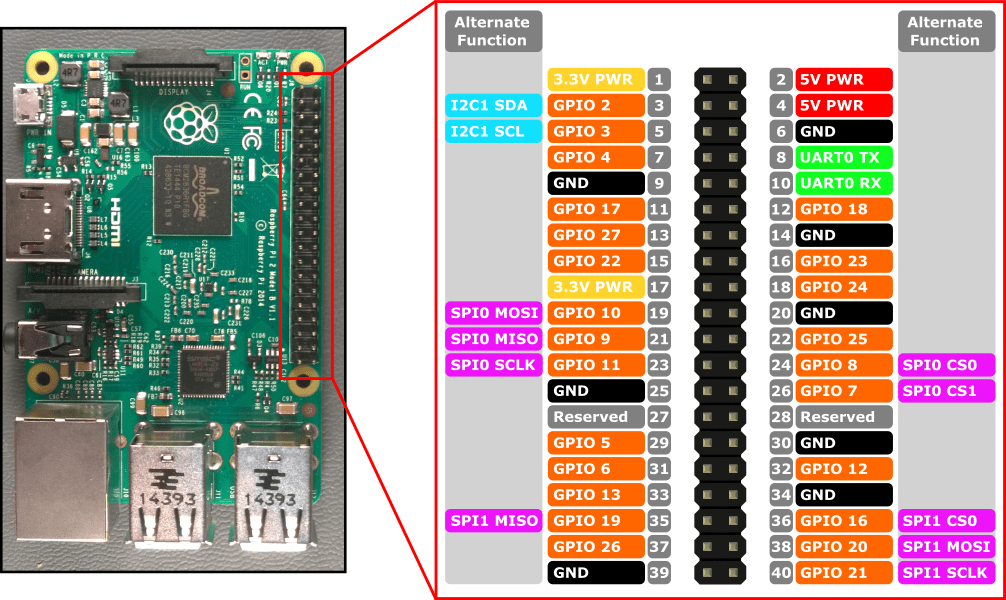
The RTC module will communicate with the Raspberry Pi using the I2C bus. This bus allows data exchange between microcontrollers and peripherals with a minimum of wiring. It consists of two signals: SCL and SDA. SCL is the clock signal, and SDA is the data signal. In your Raspberry Pi the I2C bus is located in pints 3 and 5, as can be seen in this image. Of course, you will need to power your device with 3,3 or 5 V. So to connect your device you will only need 4 wires: PWR, GND, SDA and SCL. Depending on the module bought, the pinout will be already adapted to Raspberry PI and the connection will be, as in my case, extremely easy.
Using the Hardware clock
You can read the Raspberry’s system time by using command date. If your current date is not correct, use the NTP daemon to set it correctly.
sudo service ntp stop
ntpd -gq
sudo service ntp start
To check how is time being synchronised you can use the following command.
ntpq -pn
You will receive something similar to this:
     remote           refid      st t when poll reach   delay   offset  jitter
==============================================================================
-173.249.29.54   222.217.153.8    2 u   27 1024  377   18.917    3.484   1.289
+78.47.163.171   213.239.239.164  3 u  257 1024  377   20.487   -0.790   0.448
*212.83.32.100   192.53.103.104   2 u  431 1024  377   15.244   -1.616   0.341
+173.212.244.98  131.188.3.220    2 u  988 1024  377   19.768    0.600   0.340
Your current time source is marked with a + sign. The most important field is Offset and represents the difference between the ntp server and your system clock in milliseconds.
Once you are sure that your system date is correctly set, you can use the following command to write this information in the RTC module:
sudo hwclock -w
To read the date and time back from the RTC use:
sudo hwclock -r
Or to receive more information activate the debugging in hwclock command by doing:
sudo hwclock -D

hwclock from util-linux 2.25.2
Using the /dev interface to the clock.
Last drift adjustment done at 1520531587 seconds after 1969
Last calibration done at 1520531587 seconds after 1969
Hardware clock is on UTC time
Assuming hardware clock is kept in UTC time.
Waiting for clock tick...
/dev/rtc does not have interrupt functions. Waiting in loop for time from /dev/rtc to change
...got clock tick
Time read from Hardware Clock: 2018/03/15 14:37:52
Hw clock time : 2018/03/15 14:37:52 = 1521124672 seconds since 1969
jue 15 mar 2018 15:37:52 CET  -0.489611 seconds
You can also check the deviation between the system clock and the RTC clock by using hwclock -c. It can be interesting to check how precise the RTC module is by comparing it with an updated real time after a few months of usage.
Finally, an interesting command regarding time with plenty of information is timedatectl. Here you can note the differences between System and RTC time, as well see if the NTP is updating time correctly.
timedatectl status

      Local time: jue 2018-03-15 15:35:43 CET
  Universal time: jue 2018-03-15 14:35:43 UTC
        RTC time: jue 2018-03-15 14:35:43
       Time zone: Europe/Berlin (CET, +0100)
     NTP enabled: yes
NTP synchronized: yes
 RTC in local TZ: no
      DST active: no
 Last DST change: DST ended at
                  dom 2017-10-29 02:59:59 CEST
                  dom 2017-10-29 02:00:00 CET
 Next DST change: DST begins (the clock jumps one hour forward) at
                  dom 2018-03-25 01:59:59 CET
                  dom 2018-03-25 03:00:00 CEST
1 thought on “Keeping your Raspberry Pi on time with a RTC module”