
Contents
Introduction
Kodi is an open source media player software specially designed for televisions and remote controls. It is cross platform and allows users to play and view the most popular audio and video formats converting the machine where it is running in a Home Theater PC (HTPC).
In this post the most important steps to install Kodi in Raspberry Pi from scratch will be summarized. If you only want to install Kodi and prefer not to mess up with linux, you should download directly Kodi centered distributions such as LibreELEC or OpenELEC and not follow this guide. These distributions come with a running Kodi version and will require very little configuration from you.
Preparing the environment
The starting point of this tutorial is a Raspberry Pi 3 model B with Raspbian lite version installed and running. You can check these posts to install and configure your system.
Like every time that you install new software in your Raspberry Pi, it is a good practice to perform an update of the package lists from the repositories. To do so, just run:
sudo apt-get update
Before starting the installation, you should notice that running Kodi on Raspbian needs a minimum of 160 MB of RAM dedicated to the GPU. The default assignation is 64 MB, while the most common Raspberry models have 1 GB RAM (Raspberry 2/3 Model B). For the majority of users it is enough to increase this value to 256.
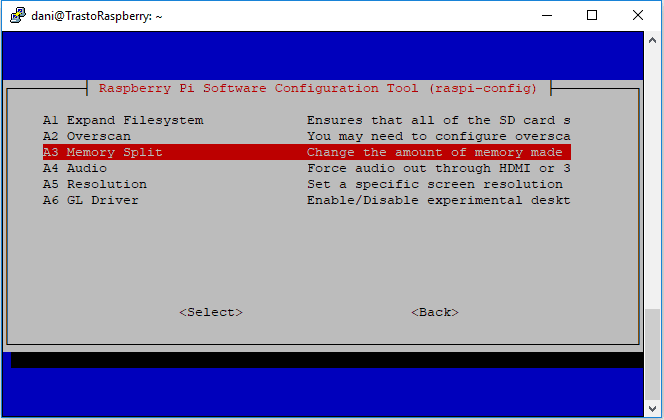
To change this value, you can use raspi-config:
sudo raspi-config

Option 7 – Advanced Options

A3 – Memory Split

Set Value to 256
On the other hand, you can also change the memory split by editing the file /boot/config.txt. This file contains the system configuration parameters which are traditionally edited and stored using a BIOS. To update the RAM assigned to the GPU, just update the value of the property gpu_mem and reboot the system.
sudo vi /boot/config.txt

…
gpu_mem=256
…
Installing Kodi in Raspberry Pi
To start the installation of Kodi just type:
sudo apt-get install kodi
With this step you will only install the main Kodi package. Depending on your needs, you may install later additional features such as PVR, to view IP TV channels, or Wiiremote to control your Kodi using a Wiimote. Once the installation succeeds, you should be able to launch Kodi just by typing:
kodi
Note that the user that launches Kodi should be a member of several groups to ensure that everything works fine. In this post I explained how to copy the default pi user groups to a new user. Anyway, if you experience permissions problems run the following code, replacing dummyUser for the desired user name.
sudo usermod -a -G audio,video,input,dialout,plugdev,netdev,users,cdrom,tty “dummyUser”
Autostarting Kodi at boot
As you can find in a quick search in Google, there are a lot of ways of making Kodi to autostart at boot.
Let’s see two alternatives:
… as a service
For instance, you can create a systemd service as explained in this post. The service can be as simple as the following code:
sudo vi /lib/systemd/system/kodi.service

[Unit]
Description = Kodi Media Center
After = remote-fs.target network-online.target
Wants = network-online.target

[Service]
User = dani
Group = dani
Type = simple
ExecStart = /usr/bin/kodi

[Install]
WantedBy=multi-user.target
Once the service is placed, run systemctl enable to configure the service according to the parameters contained in the unit file. The you should be able to start/stop the service as any other linux service.
sudo systemctl enable kodi.service
sudo service kodi status/start/stop
… with .bashrc
The file .bashrc is a shell script that Bash runs whenever it is started interactively and is located in the home of the user. As was shown in this post, if your Raspberry Pi is configured to launch and autologin in a console, you can configure your user’s .bashrc file to lauch Kodi with the first console opened in the system. Just add the following code at the end of the file:
vi .bashrc
...
if [ $(tty) == /dev/tty1 ]; then
kodi
fi